
How to fix Windows search bar not finding apps or files
When the Windows search bar doesn't show apps or files, shows a blank screen, the background search process or indexing database is probably frozen or corrupted. This step-by-step guide will help you fix Windows search and get your results showing again in Windows 10 and 11.
Quick fix: Press Ctrl + Shift + Esc to open Task Manager. Find SearchHost.exe (Windows 11) or SearchUI.exe (Windows 10) under the Processes tab, right-click it, and select End task. Windows will restart the search process and hopefully fix the temporary freeze problem.
Note: Rebuilding the search index or resetting the search app only refreshes Windows search catalog database and restores the search user interface components. It will not delete your personal files, documents, or installed programs.
Restart the Windows Search process
If the search window appears completely blank or freezes when typing, ending the background search process forces Windows to relaunch a fresh instance instantly.
- Press Ctrl + Shift + Esc to open Task Manager.
- In Windows 10, click More details if in compact view.
- In the Processes tab, right-click the SearchHost.exe (Windows 11) or SearchUI.exe (Windows 10) process and select End task.
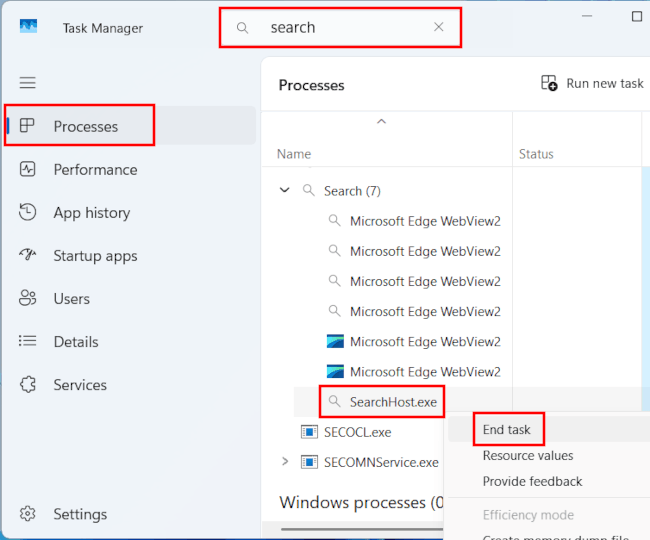
Alternatively, press Windows + R to open the Run dialog, copy and paste the following command, and press Enter to restart both processes via Command Prompt:
taskkill /F /IM SearchHost.exe /IM SearchIndexer.exe
If this solution doesn't fix your problem, try restarting your computer.
Check for updates
A bug in the Windows operating system might be causing the search problem. Installing the latest update may fix it.
- On Windows 11, go to Settings > Windows Update. On Windows 10, go to Settings > Update & Security > Windows Update.
- On the right side of the Settings window, click Check for updates, then download and install any available updates.
Run the Search and Indexing troubleshooter
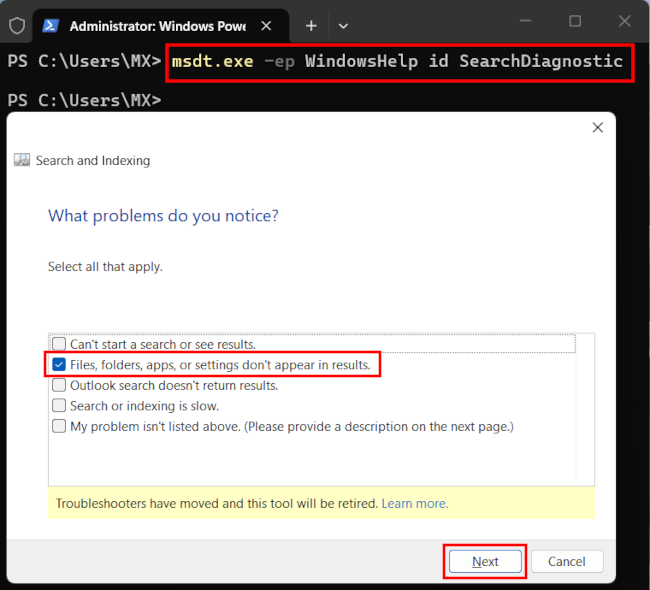
When Windows detects a problem with search, it automatically runs the Search and indexing troubleshooter. This troubleshooter resets Windows Search to the default experience. You can use the Windows Search and Indexing troubleshooter to try to fix any problems that might have with search. To use the troubleshooter, follow these steps:
- Right-click the Windows Start menu button and select Terminal (Admin) (Windows 11) or Command Prompt (Admin) or Windows PowerShell (Admin) (Windows 10).
- Copy and paste the following command:
msdt.exe -ep WindowsHelp id SearchDiagnostic - Press Enter.
- When the Search and indexing troubleshooter appears, click Next.
- Check the box for Files, folders, apps, or settings don't appear in results.
- Click Next.
- Follow the on-screen repair prompts.
Rebuild the Windows search index
If Windows search can't find files or apps, the index database may be corrupted. Rebuilding it wipes the index and rebuilds a new index database.
- Press Windows + R to open the Run dialog.
- Type
control.exe /name Microsoft.IndexingOptions. - Press Enter to open Indexing Options.
- Click the Advanced button at the bottom of the window.
- Click Rebuild under Troubleshooting.
- Click OK when Windows warns that rebuilding might take a long time to complete.
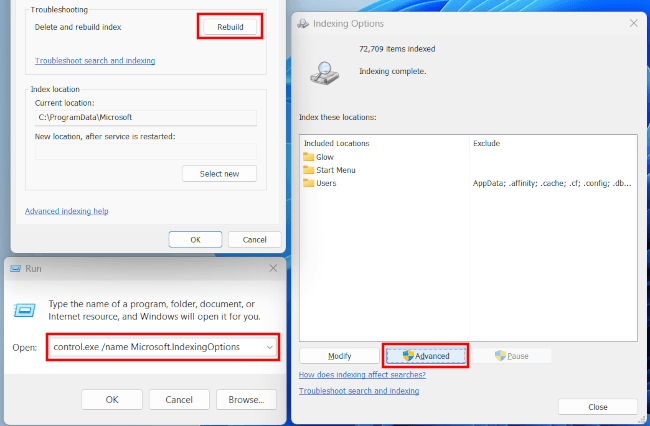
The indexing process runs quietly in the background. Full search capabilities will restore once indexing completes.
Tip: In Windows 11, you can also open Indexing Options by going to Settings > Privacy & security > Search > Advanced indexing options. In Windows 10, you can open it by going to Settings > Search > Searching Windows > Advanced Search Indexer Settings under More Search Indexer Settings.
Reset Windows Search
Windows 10
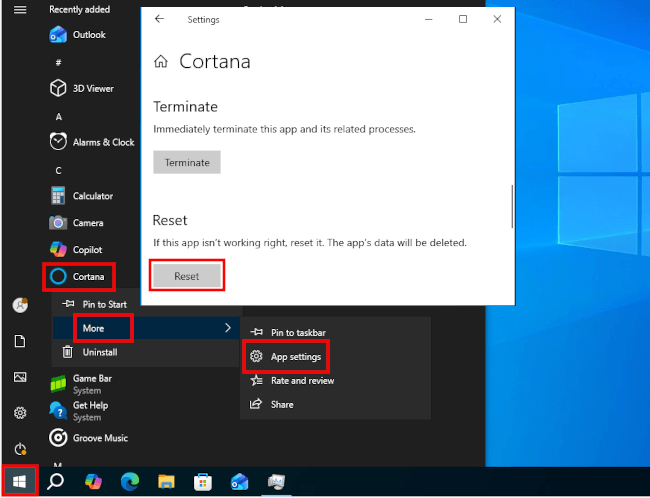
- Click the Windows Start menu button.
- Right-click Cortana, then select More > App settings.
- In the Cortana settings, click Reset.
Windows 11
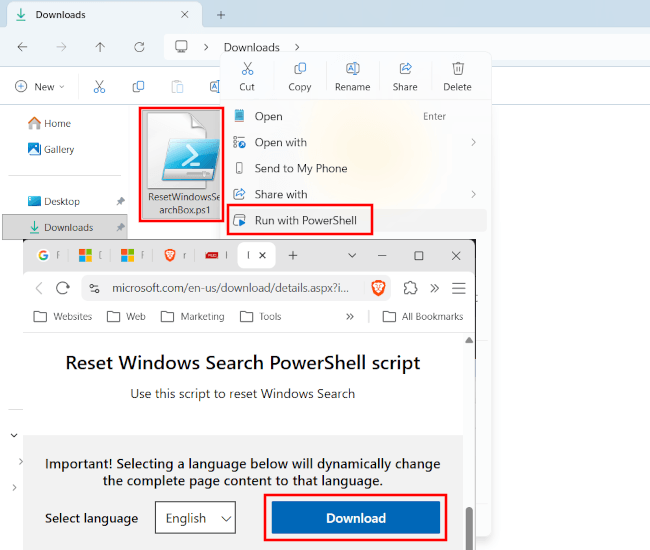
- Download ResetWindowsSearchBox.ps1 from the official Microsoft website.
- Right-click the ResetWindowsSearchBox.ps1 file and select Run with PowerShell.
- If asked to allow this app to make changes to your device, click Yes.
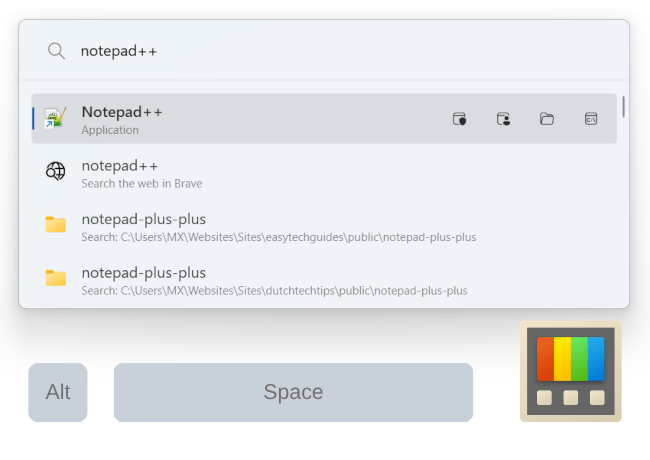
Use Microsoft PowerToys (temporary solution)
Microsoft PowerToys is a set of utilities for power users to tune and streamline their Windows 10 and 11 experience for greater productivity. It also includes a powerful search bar, which you can open by pressing Alt + Space on your keyboard.
Repair System Files (DISM & SFC)
System File Checker (SFC) is a built-in Windows tool that checks system files and repairs them if required.
- Right-click the Windows Start menu button and select Terminal (Admin) (Windows 11) or Command Prompt (Admin) or Windows PowerShell (Admin) (Windows 10).
- Type (or copy and paste) the following command:
DISM /Online /Cleanup-Image /RestoreHealth - Press Enter.
- Wait for the verification to reach 100%. This process may take some time. It may appear stuck at around 60% for a few minutes. Do not close the window.
- Once DISM is finished, type:
sfc /scannow - Press Enter.
- Wait for the scan to complete. This process may take some time. SFC will show you whether it found corrupt system files and successfully repaired them.
- Restart your computer.
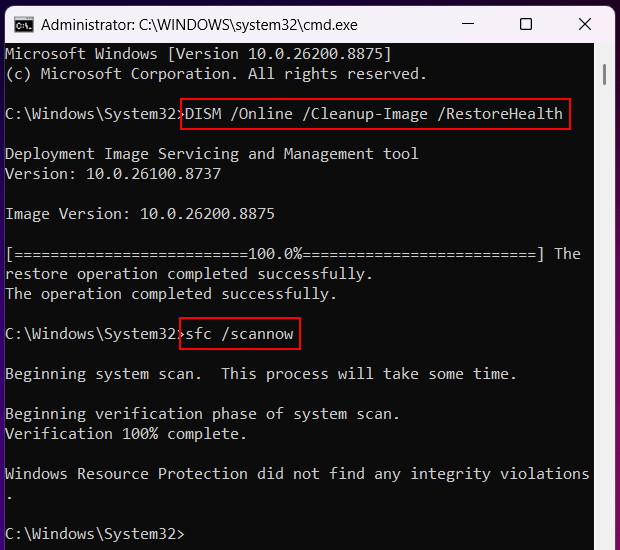
Note: DISM provides the files required to repair your corrupted system files; therefore, Microsoft recommends running DISM prior to running the System File Checker (sfc /scannow).
If the System File Checker tool is unable to fix corrupt files, visit my fix 'SFC unable to fix corrupt files' page.
Related:
How to fix Windows Start menu button not working (fast fixes)
How to fix missing or blank taskbar icons in Windows 10 & 11
How to repair or reset the Settings app in Windows 11 & 10
References: