How to password protect files and folders on Windows 10 & 11 (4 ways)
Learn how to password protect files and folders on Windows 10 and 11.
On this page, you will also find steps for encrypting and hiding files in audio files using DeepSound. Just like the cybersecurity engineer and hacker Elliot does in the tv series “Mr.Robot”.
The steps on this page work for all types of files, such as documents, images, audio files, video files, and all other files.
7-Zip
7-Zip is a free open-source file archiver for Microsoft Windows.
IMPORTANT!
If you lose or forget the password, you will never be able to access the encrypted files or folders. That's why you should save the password using a password manager or memorize the password.
And also, you should use a strong password with at least 20 characters long. A password is often the weakest link in encryption.
So if your password is something like 123456, qwerty, iloveyou, or another weak password, then even someone with basic computer knowledge can access your encrypted data easily and quickly.
1. Open File Explorer (Windows Explorer).
2. Go to the file(s) or folder(s) you want to encrypt.
3. If you want to encrypt multiple files or folders, then you will need to select all the files or folders you want to encrypt. You can select multiple files or folders by holding the control key Ctrl and clicking on the files or folders. Or click on the first file or folder, hold the Shift key and then click on the last file or folder. Or press the Ctrl + A keys.
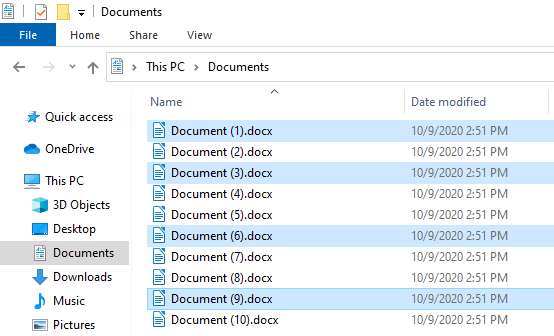
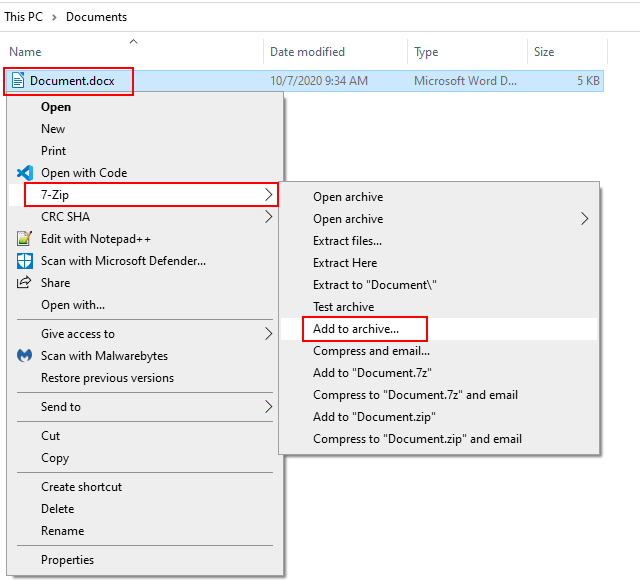
4. Right-click on the file or folder > 7-Zip > Add to archive. For multiple files or folders, you right-click on one of the selected files or folders > 7-Zip > Add to archive.
A “Add to Archive” window will appear.
5. At Archive format, you click on the selection menu button and select 7z.
6. In the Encryption section, you type the desired password twice.
7. Make sure that AES-256 is selected as encryption method.
8. If you want to encrypt file names, then check this option. This option is only available when you select the 7z archive format.
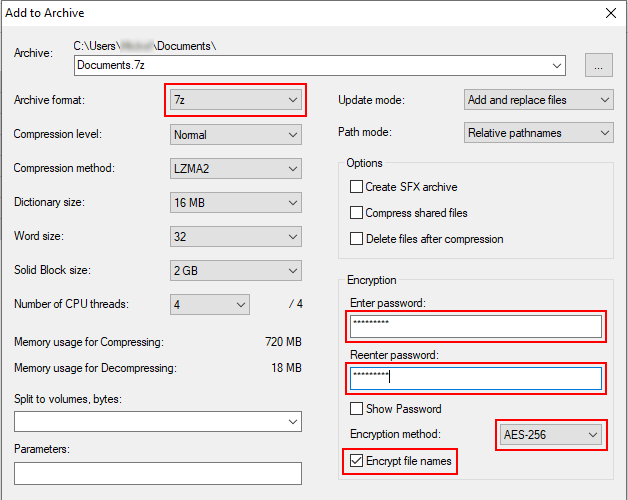
9. Click on the OK button at the bottom of the window.
7-Zip will compress the file(s) or folder(s) into a 7z file with password protection.
To decrypt and access your files or folders, you right-click on the 7z file > 7-Zip > Extract Here > enter the password > click on OK or press Enter.
WinRAR
WinRAR is a trialware file archiver for Microsoft Windows.
WinRAR isn't free, but the company offers a 40-day free trial before you're supposed to purchase a license to keep using it. But, as anyone who used it regularly knows, when those 40 days are up, nothing happens. You'll only get a frequent pop-up reminder about buying a license, but you can continue using WinRAR for free forever.
IMPORTANT!
If you lose or forget the password, you will never be able to access the encrypted files or folders. That's why you should save the password using a password manager or memorize the password.
And also, you should use a strong password with at least 20 characters long. A password is often the weakest link in encryption.
So if your password is something like 123456, qwerty, iloveyou, or another weak password, then even someone with basic computer knowledge can access your encrypted data easily and quickly.
1. Open File Explorer (Windows Explorer).
2. Go to the file(s) or folder(s) you want to encrypt.
3. If you want to encrypt multiple files or folders, then you will need to select all the files or folders you want to encrypt. You can select multiple files or folders by holding the control key Ctrl and clicking on the files or folders. Or click on the first file or folder, hold the Shift key and then click on the last file or folder. Or press the Ctrl + A keys.

4. Right-click on the file or folder and then click on Add to archive. For multiple files or folders, you right-click on one of the selected files or folders and then click on Add to archive.
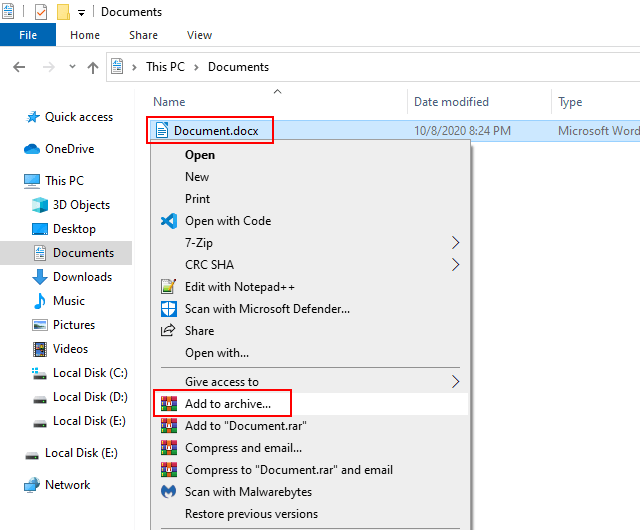
A “Archive name and parameters” window will appear.
5. At Archive format, you select RAR.
6. Click on the Set password button.
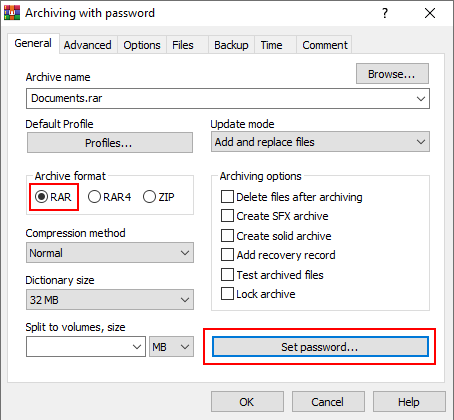
A “Enter password” window appears.
7. Type the desired password twice.
8. If you want to encrypt file names, then check this option. This option is only available when you select the RAR archive format.
9. Click on the OK button.
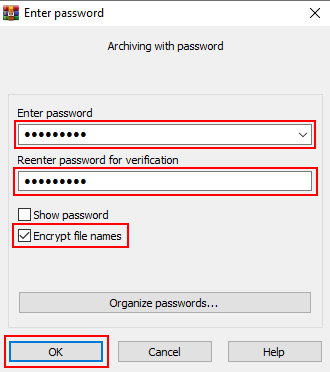
10. Click on the OK.
WinRAR will compress the file(s) or folder(s) into a RAR file with password protection.
To decrypt and access your files or folders, you right-click on the RAR file > Extract Here > enter the password > click on OK or press Enter.
DeepSound
DeepSound is a steganography tool and audio converter for Microsoft Windows that allows you to hide secret data into audio files.
DeepSound is the program that the character Elliot uses in the tv series Mr.Robot to encrypt and hide his secret data in music CDs.
IMPORTANT!
If you lose or forget the password, you will never be able to access the encrypted files or folders. That's why you should save the password using a password manager or memorize the password.
And also, you should use a strong password with at least 20 characters long. A password is often the weakest link in encryption.
So if your password is something like 123456, qwerty, iloveyou, or another weak password, then even someone with basic computer knowledge can access your encrypted data easily and quickly.
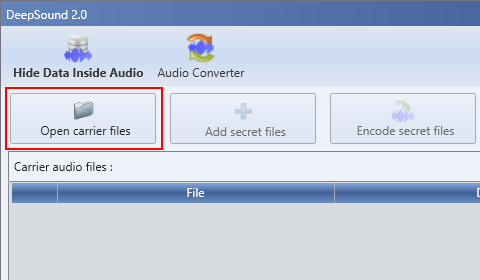
1. Open DeepSound.
2. Click on Open carrier files in the upper left corner.
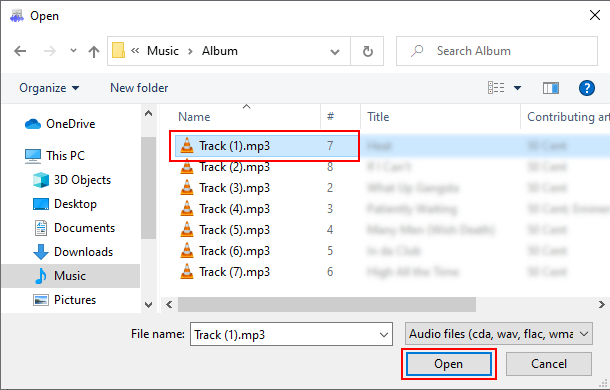
A “Open” window will appear.
3. Within this window, you go to the location on your PC where the audio track is stored you want to use to hide your data in.
4. Select the audio track.
5. Click on the Open button.
6. Click on Add secret files.
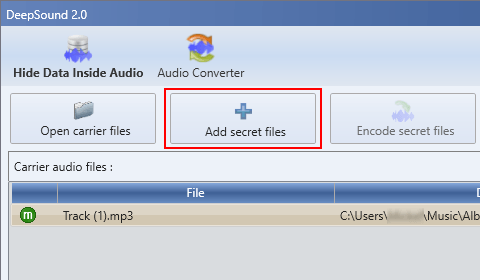
A “Open” window will appear.
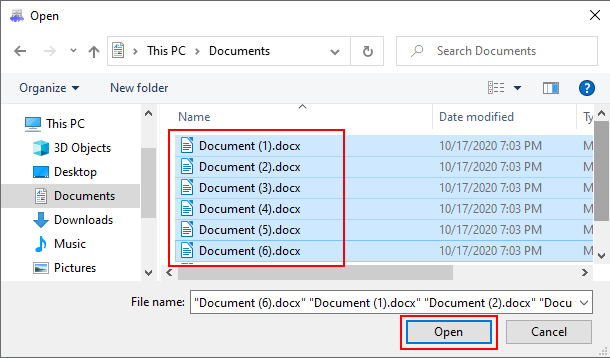
7. Within this window, you go to the location on your PC where the files are stored you want to encrypt and hide.
8. Select the files.
9. Click on the Open button.
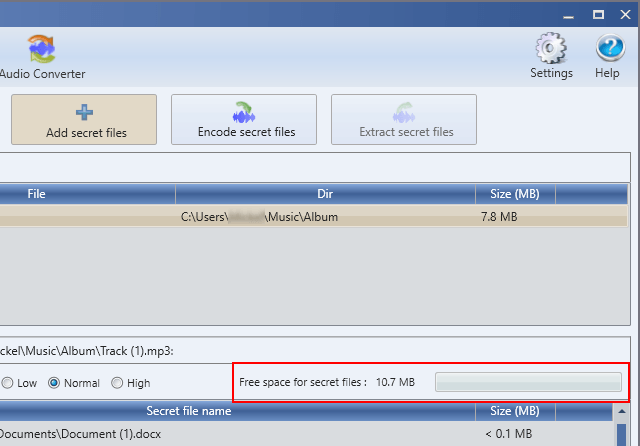
Tip: When you click on an audio track, you can see at Free space for secret files how much file size in MB you can hide inside the selected audio track.
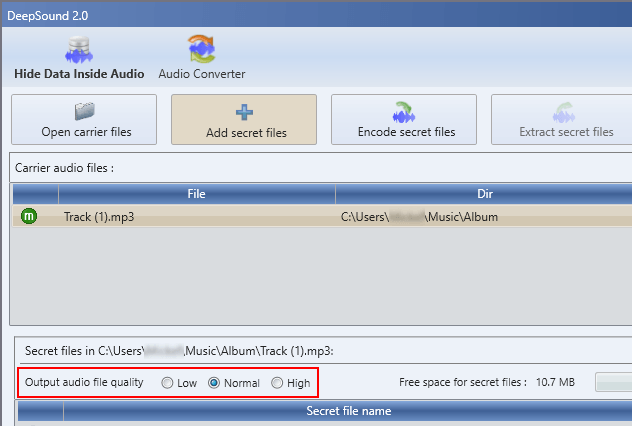
If you have more files to encrypt and hide than the available free space, then you can either divide the files over multiple audio tracks or change the output audio file quality to low.
10. When you're ready, you click on Encode secret files.
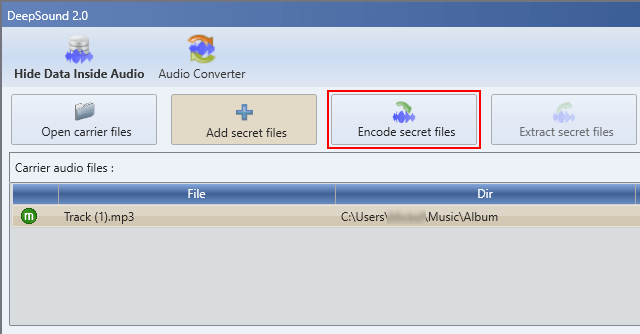
A “Encode secret files” window will appear.
11. Check the Encrypt secret files (AES-256) option.
12. Enter the password of your choice twice.
13. Click on the Encode secret files button.
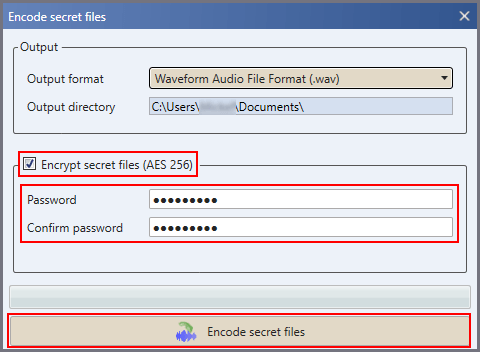
DeepSound will now encrypt and hide your file(s).
To decrypt and access your files, you click on Open carrier files > select the audio file(s) > enter the password > click on OK > click on Extract secret files.
VeraCrypt
VeraCrypt is a free open-source disk encryption software for Windows, Linux, and macOS. VeraCrypt also offers a portable version, which you don't need to install.
IMPORTANT!
If you lose or forget the password, you will never be able to access the encrypted files or folders. That's why you should save the password using a password manager or memorize the password.
And also, you should use a strong password with at least 20 characters long. A password is often the weakest link in encryption.
So if your password is something like 123456, qwerty, iloveyou, or another weak password, then even someone with basic computer knowledge can access your encrypted data easily and quickly.
1. Open VeraCrypt.
If you've downloaded the portable version, then it will first ask you to extract it somewhere on your computer.
2. Once VeraCrypt is opened, you click on the Create Volume button.
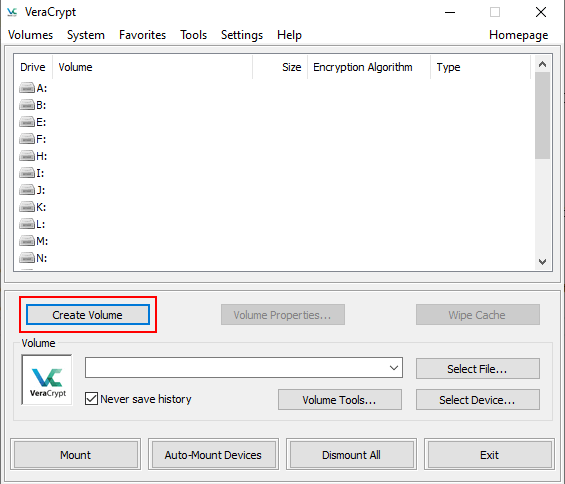
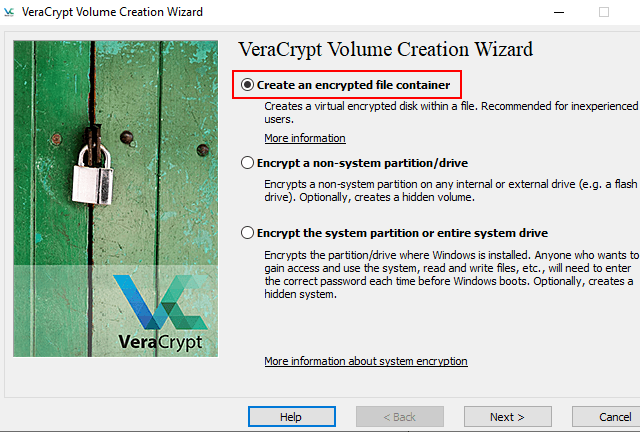
A “VeraCrypt Volume Creation Wizard” window will appear.
3. Select the Create an encrypted file container option.
4. Click on the Next button at the bottom of the window.
5. Make sure the Standard VeraCrypt volume option is selected.
6. Click on the Next button.
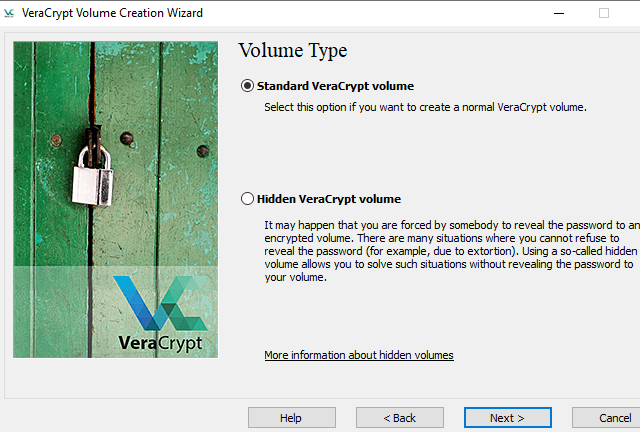
7. Click on the Select File button.
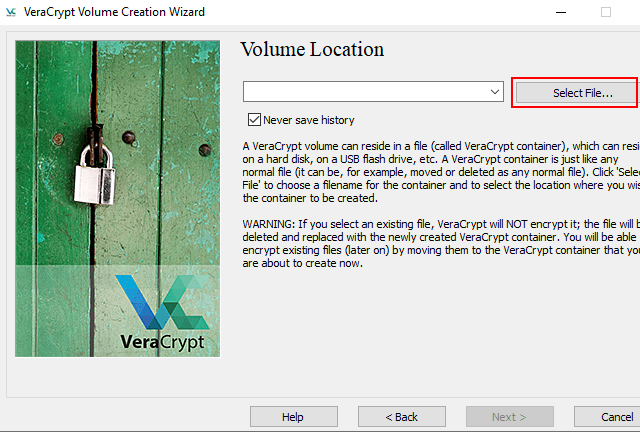
A “Specify Path and File Name” window will appear.
8. In the window, you select the location on your computer where you want to save the new encrypted volume.
9. At File name, you enter a name for the new encrypted volume.
10. Click on the Save button.
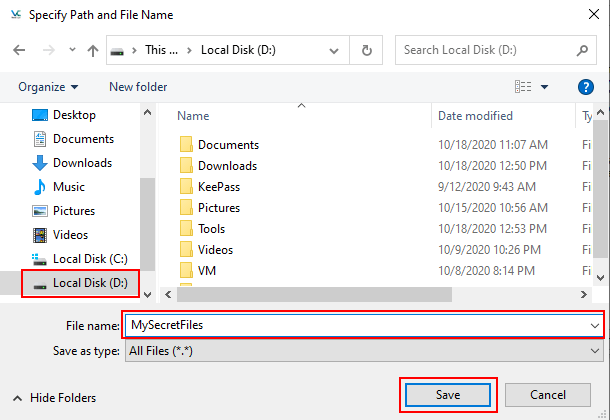
11. Click on the Next button.
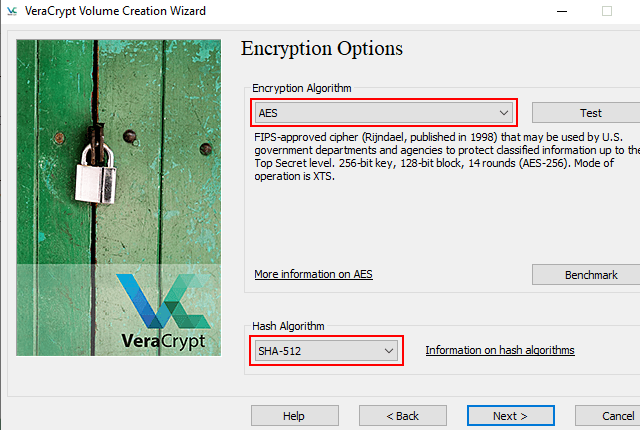
12. Make sure that AES is selected as encryption algorithm.
13. Make sure that SHA-512 is selected as hash algorithm.
14. Click on the Next button.
15. Now you can select a volume size. You can set it in KB, MB, GB or TB. I've created a 4 GB test volume for this example.
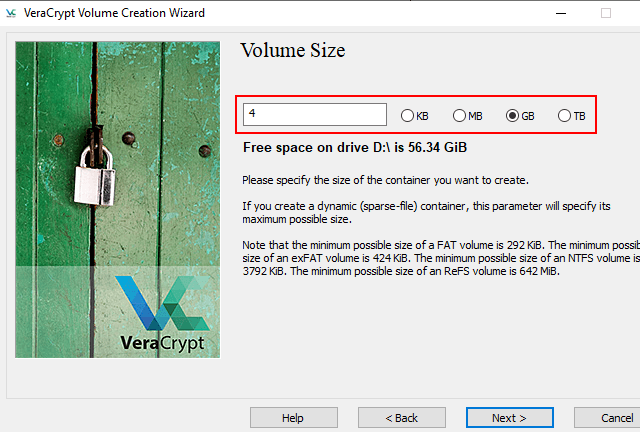
16. Click on the Next button.
17. Type the desired password twice.
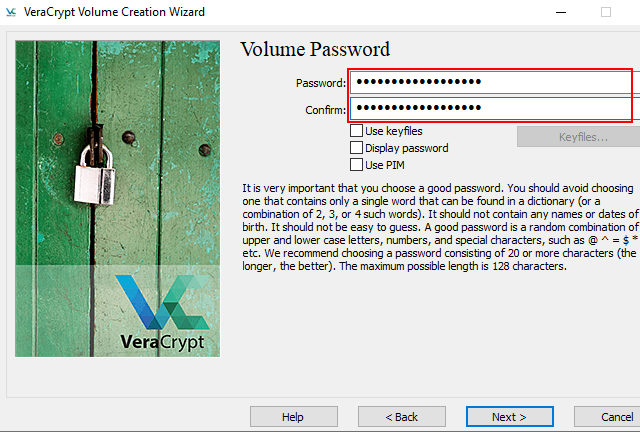
18. Click on the Next button.
19. On the next screen, you will need to move your mouse cursor as randomly as possible within the window until the bar turns green. The longer you move it, the better. This will increase the cryptographic strength of the encryption keys.
20. When you're done, you click on the Format button.
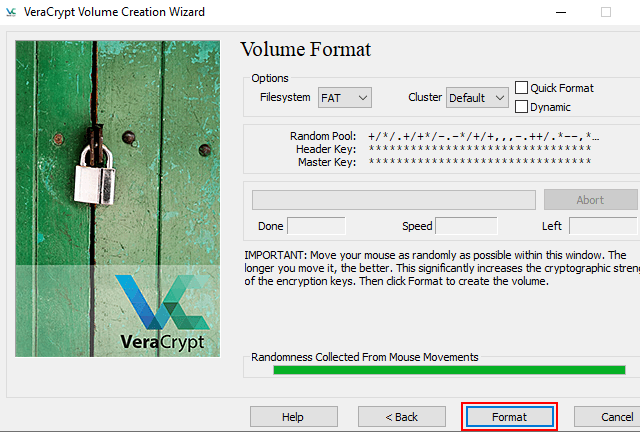
VeraCrypt will now create the new encrypted volume.
21. You can now close the VeraCrypt volume creation wizard by clicking on the Exit button in the bottom right corner.
I will now show you how you can open the encrypted volume so that you can copy files or folders to it.
22. On the main window of VeraCrypt, you click on the Select File button.
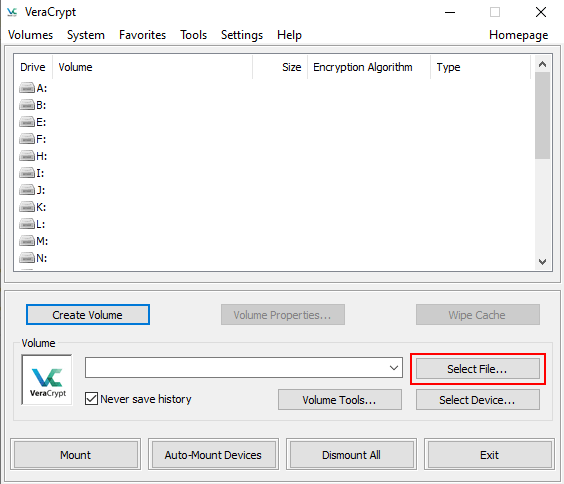
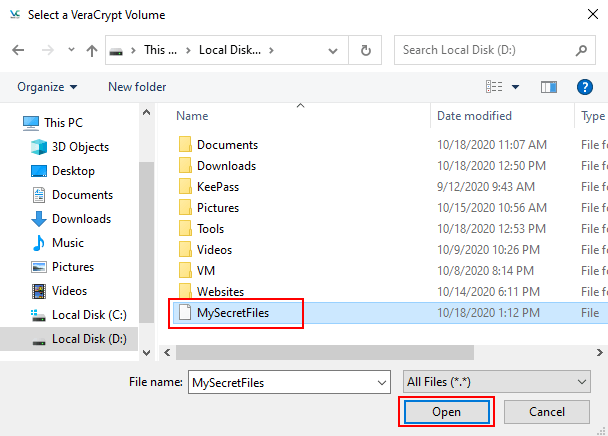
A “Select a VeraCrypt Volume” window will appear.
23. Within this window, you go to the location on your computer where the encrypted volume is stored.
24. Select the file.
25. Click on the Open button.
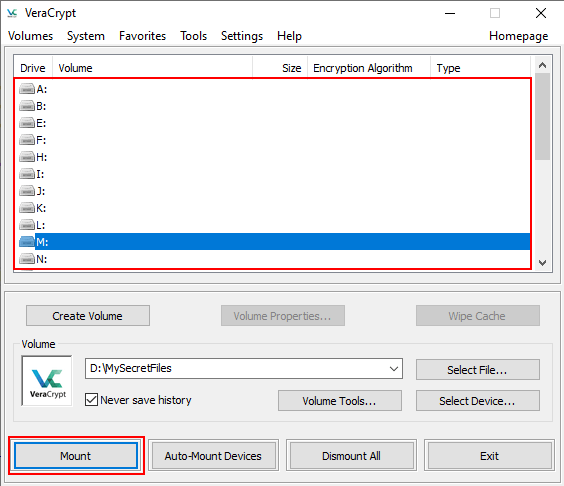
26. Select a drive letter. For this example, I've selected the letter M.
27. Click on the Mount button in the bottom left corner.
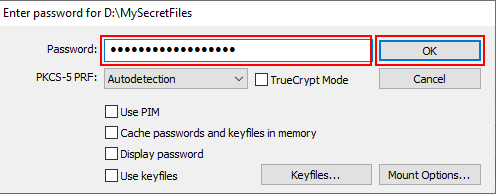
28. Enter your password.
29. Click on the OK button.
If you now open File Explorer (Windows Explorer) and look at This PC, you will see that the encrypted volume is mounted as a drive.
You can now copy files and folders to the encrypted volume.
Also, don't forget to unmount the encrypted volume when you're not actively using it. To do so, you open VeraCrypt, then select the encrypted volume, and then click on the Dismount button.
To decrypt and access your files or folders, you mount the encrypted volume again.