How to use Private DNS on an Android phone or tablet
This step-by-step tutorial will show you how to use Private DNS on an Android phone or tablet.
The steps on this page work for all Android phones and tablets, including Samsung, Google, Motorola, Nokia, OnePlus, Oppo, Xiaomi, and all other Android devices.
You can use Google Public DNS, Cloudflare DNS, Quad9, AdGuard, or another private DNS provider.
How to use private DNS on Android
-
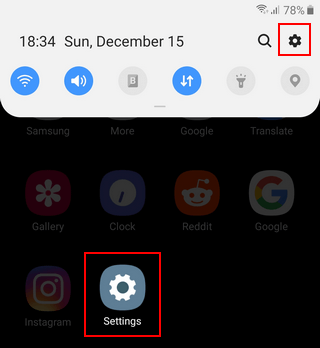
Open settings.
-
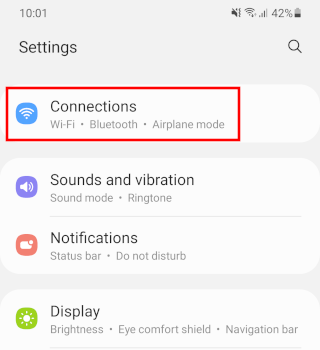
Tap on Connections or Network & internet.
-
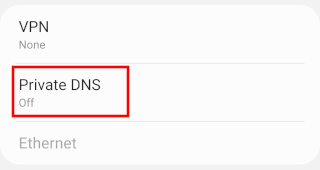
Tap on Private DNS. If you don't see the 'Private DNS' option, you may have to tap on More connection settings or Advanced.
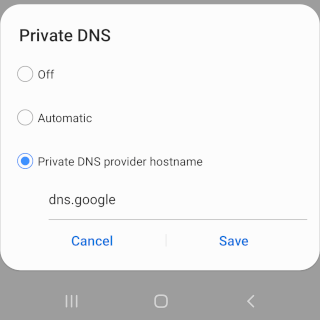
- Tap on Private DNS provider hostname to enable this option.
- Enter dns.google or one.one.one.one (Cloudflare) or 1dot1dot1dot.cloudflare-dns.com or dns.quad9.net or dns.adguard.com in the field below Private DNS provider hostname. You may need to test these DNS providers to see which one works best for you in terms of speed.
-
Tap on Save.
Your Android phone or tablet is now using a private DNS provider.
Private DNS is a feature first introduced in Android 9 that makes it easier to set up a custom private and secure DNS resolver on Android, which means that third parties between your Android device and the websites you visit won't be able to snoop on your DNS queries because they'll be encrypted.
Private DNS can improve your online security and privacy, increase internet speed, and help you unblock websites blocked by your internet provider.
If your device has Android 8 or an older version, I recommend using Cloudflare's 1.1.1.1 app, which you can find in the Google Play store.
Related:
How to set up DNS on any Android phone or tablet
How to access blocked websites on Android (6 safe methods)
References:
https://www.zdnet.com/article/how-to-turn-on-private-dns-mode-on-android-and-why-you-should/
https://www.geeksforgeeks.org/how-to-enable-private-dns-on-android/
https://www.makeuseof.com/android-private-dns-everything-you-need-to-know/
https://www.howtogeek.com/795644/how-to-enable-secure-private-dns-on-android/