How to access blocked websites on Android (6 safe methods)
Encountering a restrictive firewall on a school, corporate, or public Wi-Fi network while using your mobile device is incredibly common. While the Google Play Store is saturated with hundreds of unverified "free proxy browser" utilities, the vast majority of these applications harvest your personal telemetry data, leak your native IP address, or drain your device battery with background scripts.
Bypassing network filtering on a mobile ecosystem requires specific network modifications. You can safely access blocked websites on any Android phone or tablet using six secure, verified methods—ranging from native system configurations that require zero third-party software to high-encryption network tools.
🔒 Mobile security alert: Restrictive local networks often use deep packet sniffing to monitor traffic. If you are accessing personal accounts or typing sensitive passwords on an unblocked connection, prioritize methods that use full end-to-end payload encryption (like Method 4 or Method 5).
Method 1: Enable native Private DNS (Android 9.0 and newer)
The most elegant solution to access blocked websites on modern Android devices requires no applications. Most public, school, and internet service provider (ISP) blocks rely on basic DNS hijacking. By forcing your operating system to route lookups through an encrypted DNS-over-TLS tunnel, you cleanly strip away the local filter's ability to intercept and block your destination requests.
- Swipe down from the top of your screen and tap the Settings (gear) icon.
- Tap on Network & internet (on Samsung Galaxy devices, navigate to Connections > More connection settings).
- Select the Private DNS option. (If it is not visible, use the settings search bar to find 'Private DNS').
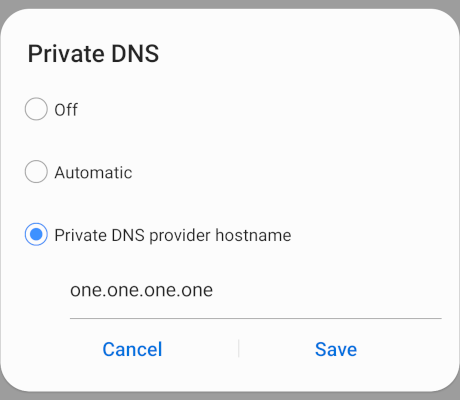
- Change the selection to Private DNS provider hostname.
- Type this exact encrypted string in the input field: one.one.one.one (or 1dot1dot1dot1.cloudflare-dns.com)
- Tap Save.
Your device will instantly encrypt all outbound lookups via Cloudflare's secure servers.
Method 2: Change Wi-Fi IP settings to static (Android 8.0 and older)
If you are utilizing a legacy Android device running Android 8.0 Oreo or older, the native system-wide Private DNS layer does not exist. However, you can manually override your active network connection's DNS lookups directly within your Wi-Fi interface settings to bypass parental controls and basic filters.
- Open your Android device's Settings.
- Tap on Network & internet or Connections (Samsung).
- Tap on Wi-Fi.
- Press and hold the name of your active Wi-Fi network, or tap the Gear icon directly next to it.
- Select Modify network or expand the Advanced dropdown menu.
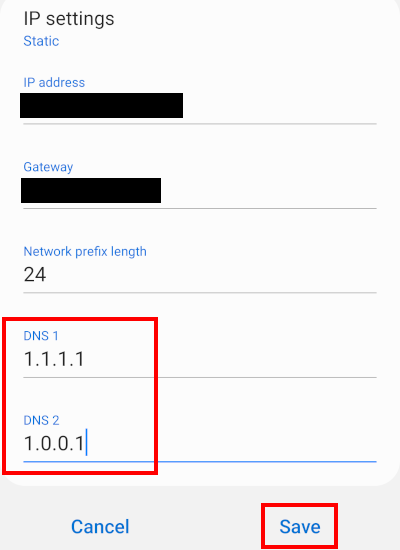
- Locate the IP settings field and switch it from DHCP to Static.
- Leave the default IP address, Gateway, and Network prefix length exactly as they are.
- Scroll down to the DNS 1 field and enter: 1.1.1.1
- Navigate to the DNS 2 field and enter: 1.0.0.1
- Tap Save.
The connection will quickly cycle, applying the custom DNS servers.
Method 3: Enable Secure DNS inside mobile browsers
If you are utilizing a school-issued or corporate Android device where the main system Settings app is completely disabled or locked down by an administrator, you cannot change system-wide DNS profiles. Fortunately, you can bypass network filters exclusively at the application layer by enabling DNS over HTTPS (DoH) directly inside your preferred mobile browser settings.
Chrome & Brave for Android
- Open your browser
- Tap the three-dot menu button in the top-right corner.
- Select Settings.
- Tap on Privacy and security (Chrome) or Brave Shields & privacy (Brave).
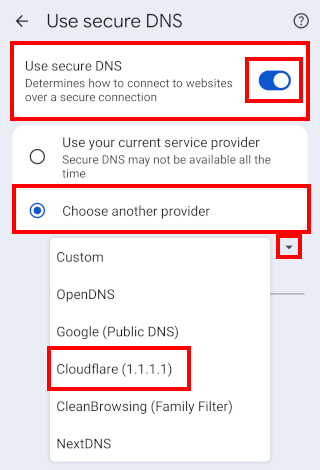
- Tap on Use secure DNS.
- Enable Use secure DNS.
- Select Choose another provider.
- Tap the dropdown menu and select Cloudflare (1.1.1.1) from the secure list.
Firefox for Android
- Open Firefox.
- Tap the three-dot menu button in the top-right corner.
- Select Settings.
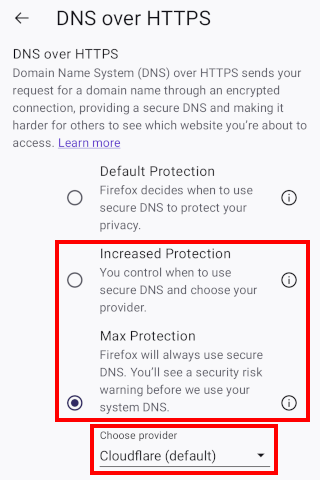
- Scroll down to the Privacy and security section and tap on DNS over HTTPS.
- Change your protection level to either Increased Protection or Max Protection.
- Ensure your designated secure resolver is set to Cloudflare.
- Exit the settings menu.
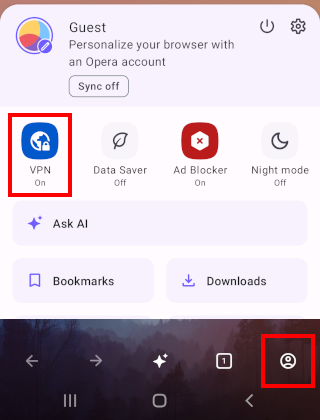
Method 4: Use Opera Browser's Built-In Browser VPN
When you cannot modify system settings—or local mobile device profiles lock down system menus—you can bypass blocks exclusively at the application level. The official Opera Browser for Android features a native, unmetered, no-logs VPN built directly into the application layout, protecting your activity without affecting external system apps.
- Download and install the standard Opera Web Browser from the official Google Play Store.
- Open the browser.
- Tap the profile icon located in the bottom right corner of the screen.
- Tap VPN to turn it on.
- To change the location or change other VPN settings, press and hold VPN.
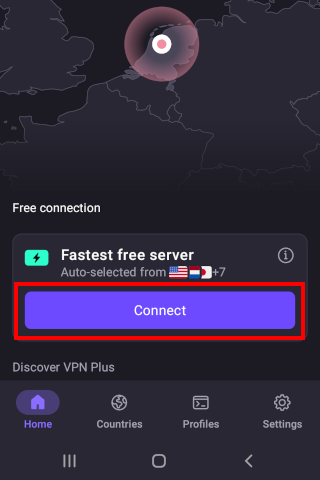
Method 5: Use ProtonVPN Free (Device-Wide Encryption)
If the network firewall utilizes deep packet inspection (DPI) to monitor data payloads rather than simple domain paths, changing your DNS will fail. You need a Virtual Private Network to seal all mobile device traffic inside a cryptographic tunnel. For Android, avoid dangerous "one-click" proxies and deploy a strict zero-logs client.
- Install the official ProtonVPN client from the Google Play Store and create a free tier account.
- Open the application.
- Grant the Android system permission to construct a VPN connection configuration if prompted.
- Tap the prominent Connect action button.
- The app will automatically establish an encrypted handshake with a zero-logs server node (typically located across the United States, Netherlands, or Japan). All outbound apps and web browsers on your device can now access the web cleanly.
Method 6: Use Tor Browser for Android (defeat deep censorship)
If you are encountering an aggressive national or corporate firewall that actively tracks and drops standard VPN connections, the open-source Tor Browser for Android is the ultimate network bypass utility. It completely anonymizes mobile traffic by bouncing data through three distinct encrypted nodes worldwide.
- Navigate to the Google Play Store and download the official Tor Browser application.
- Open the Tor browser app on your device.
- Turn on the Always connect automatically option.
- Tap the Connect button.
- Allow the status bar to complete its progress tracking sequence. Once established, enter any blocked domain string into the URL address bar.
💡 Performance note: Because Tor routes and encrypts your Android traffic across a multi-layered global volunteer server network, your overall browsing speed will drop notably. Use this specific method for essential text lookup and bypassing strict blocks rather than high-speed video streaming utilities.
⚙️ Advanced Tor alternatives for mobile apps:
If you need to route traffic from specific standalone Android apps (not just your web browser) through the Tor network, you have two cutting-edge options:
- Orbot (by Guardian Project): This trusted, open-source proxy tool leverages the Tor network to let you choose exactly which background applications on your phone have their traffic encrypted and routed away from local firewalls.
- Tor VPN Beta (by The Tor Project): This is the official, experimental tool built on Tor's next-generation Rust architecture (Arti). It acts as a device-wide VPN to mask your IP across all apps. However, because it is still in active beta testing, expect occasional connection drops and UI bugs. Only use it for basic testing and firewall bypassing—not for high-stakes privacy.
Ineffective Android "tricks" to avoid
Many legacy web guides suggest old workarounds that fail against modern firewall hardware architectures. Avoid the following dangerous or obsolete methods entirely:
| Obsolete mobile trick | The theoretical goal | Why it fails & risks your device |
|---|---|---|
| Modifying APN settings | Altering Access Point Names inside cellular network configuration panels to bypass mobile carrier filtering rules. | Connection Disruption: Altering APN data strings will completely terminate your mobile carrier data provisioning connection, requiring a full network reset to fix, while failing to bypass modern SNI filtering rules. |
| Shady Play Store proxy apps | Installing unverified free "unblocker" browser or standalone proxy tools that promise instant, unmetered access. | Security Risks: Independent technical audits prove these tools frequently inject malicious advertising scripts, harvest device telemetry, sell user web logs, or lack any underlying traffic encryption schemas. |
Related:
How to unblock blocked websites (4 safe and free methods)
How to use Private DNS on an Android phone or tablet
How to set up DNS on any Android phone or tablet
References:
https://www.howtogeek.com/795644/how-to-enable-secure-private-dns-on-android/
https://www.zdnet.com/article/how-to-turn-on-private-dns-mode-on-android-and-why-you-should/
https://www.androidpolice.com/use-preferred-dns-server-android-tutorial/