How to set up DNS on any Android phone or tablet
A straightforward step-by-step guide to setting up custom or private DNS on any Android phone or tablet to improve your speed and privacy.
You can use Google Public DNS, Cloudflare DNS (1.1.1.1), Quad9, AdGuard, or another third-party provider on your Android phone or tablet.
The steps on this page work for all major devices, including Samsung, Lenovo, Motorola, OnePlus, ASUS, Nokia, Google, Sony, LG, and other Android models.
Changing your DNS improves online security and privacy, can increase your internet speed, and helps you unblock websites restricted by your Internet service provider.
Method 1: Set up Private DNS on Android via settings
Modern Android phones support Private DNS. Private DNS uses DNS-over-TLS to provide security and privacy for your DNS queries. DNS-over-TLS improves privacy and security between clients and resolvers.
- Open your Android device's settings.
- Tap Network & internet or Connections (Samsung).
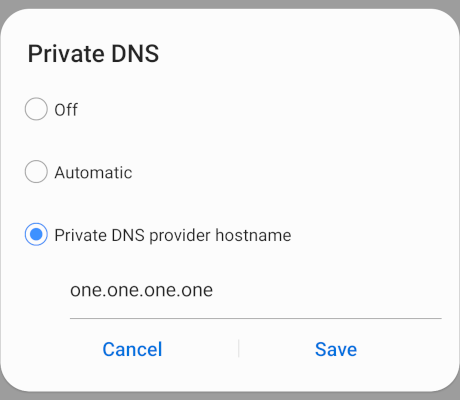
- Tap Private DNS. If you don't see the Private DNS option, you may have to tap on More connection settings or Advanced.
- Select Private DNS provider hostname.
- In the 'Private DNS' input field, type one of the following exact text strings: dns.google or one.one.one.one (Cloudflare) or 1dot1dot1dot.cloudflare-dns.com or dns.quad9.net or dns.adguard.com
- Tap Save.
Your Android device is now using a private DNS provider.
Method 2: Set up DNS on Android via Wi-Fi settings
These steps work on all Android devices but apply only to Wi‑Fi networks.
- Open your Android device's settings.
- Tap on Network & internet or Connections (Samsung).
- Tap on Wi-Fi.
- Press and hold the name of your active Wi-Fi network, or tap the Gear icon directly next to it.
- Select Modify network or expand the Advanced dropdown menu.
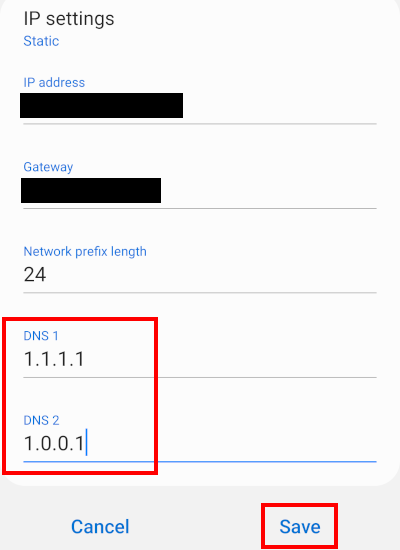
- Locate the IP settings field and switch it from DHCP to Static.
- Leave the default IP address, Gateway, and Network prefix length exactly as they are.
- Scroll down to the DNS 1 field and enter: 1.1.1.1 (Cloudflare) or 8.8.8.8 (Google) or 9.9.9.9 (Quad9) or 94.140.14.14 (AdGuard).
- Navigate to the DNS 2 field and enter: 1.0.0.1 (Cloudflare) or 8.8.4.4 (Google) or 149.112.112.112 (Quad9) or 94.140.15.15 (AdGuard).
- Tap Save.
You may need to disconnect from the Wi‑Fi network and reconnect for the changes to take effect. Your smartphone is now using different DNS servers. You may want to test different DNS providers to see which one offers the best speed.
Method 3: Set up DNS on Android using DNS changer apps
If your phone or tablet runs an older version of Android, you can use a dedicated DNS changer application to update your settings.
Cloudflare's 1.1.1.1 and BGNmobi's DNS Changer are free options available in the Google Play store.
BGNmobi's DNS Changer lets you choose from a built-in list of different DNS providers. In contrast, custom apps like Cloudflare's 1.1.1.1 or Quad9 Connect only connect you directly to their own specific servers.
Notes:
- When using Cloudflare's 1.1.1.1 app, you don't need to use the WARP VPN feature. WARP is usually enabled by default, but you can disable it by tapping the ≡ menu button in the top right corner and selecting 1.1.1.1.
- The first time you run a DNS changer app, it will ask for permission to set up a local VPN profile on your device.
- If you want to use a standard VPN, you must disconnect and close the DNS changer app first. You cannot run both at the same time.
- You may want to test a few different DNS providers to see which one delivers the best speeds on your network.
- The Cloudflare 1.1.1.1 app is completely ad-free, while BGNmobi's DNS Changer will display ads.
If Cloudflare's network is fast in your region, I highly recommend using their official 1.1.1.1 app.
Related:
How to use Private DNS on an Android phone or tablet
How to access blocked websites on Android (6 safe methods)
How to unblock blocked websites (4 safe and free methods)
References:
https://www.howtogeek.com/795644/how-to-enable-secure-private-dns-on-android/
https://www.zdnet.com/article/how-to-turn-on-private-dns-mode-on-android-and-why-you-should/
https://www.androidpolice.com/use-preferred-dns-server-android-tutorial/