How to remove sound from a video (step by step)
These step-by-step tutorials will show you how to permanently remove sound from a video using VLC media player, Shotcut, HandBrake, Clipchamp, or Filmora.
The result will be a new video file without sound.
The original video file will not be affected.
The steps on this page work on Windows, Linux, and macOS.
How to remove sound from a video using VLC media player
VLC is a free and open-source cross-platform media player for Windows, Linux, and macOS.
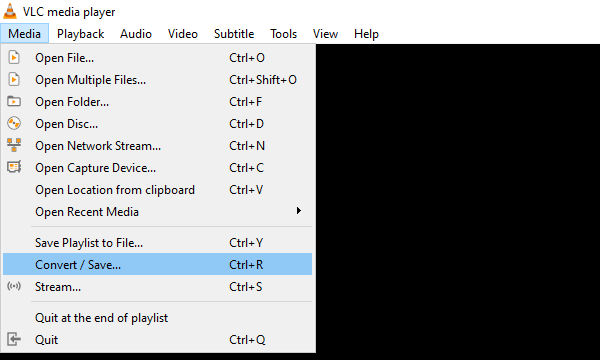
- Open VLC media player.
- Click on Media located in the top left corner.
-
Click on Convert / Save.
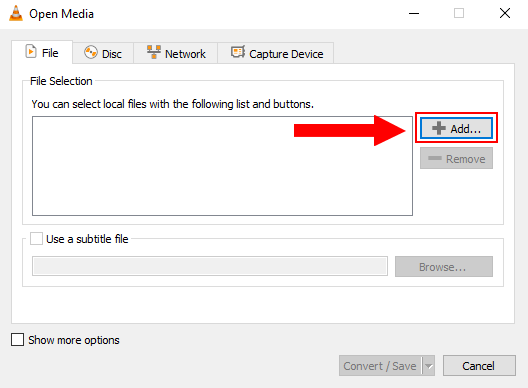
-
In the next window, you click on Add.
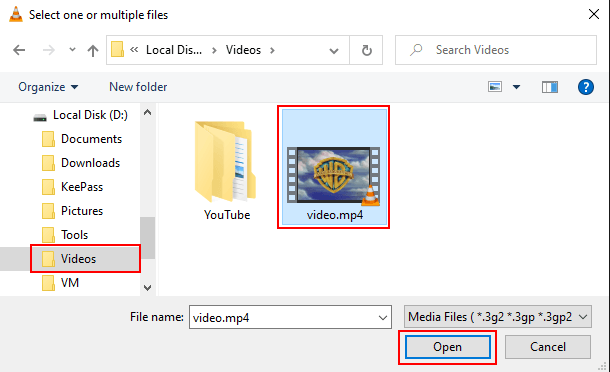
- In the next window, you go to the video you want to edit.
- Select the video.
-
Click on Open.
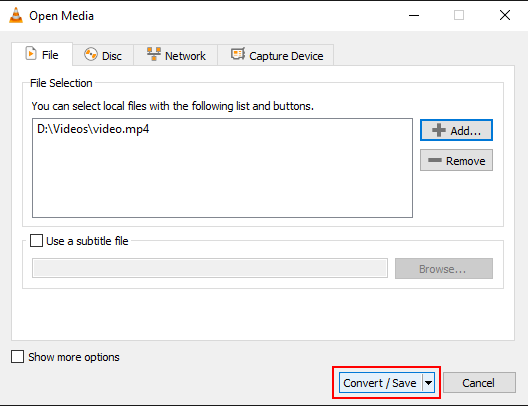
-
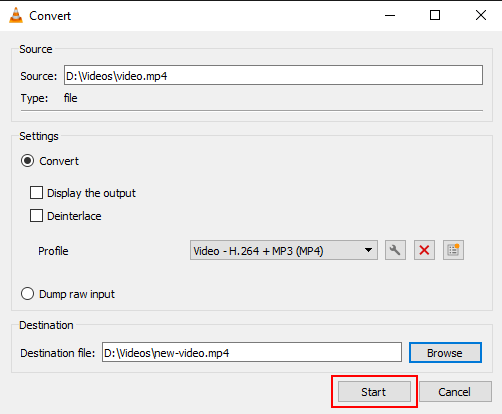
Click on Convert/Save at the bottom of the window.
-
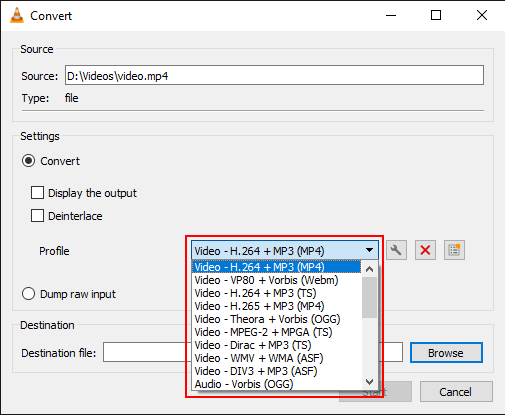
In the next window, you select a video format at Profile. If you want an MP4 video file, you select Video - H.264 + MP3 (MP4).
-
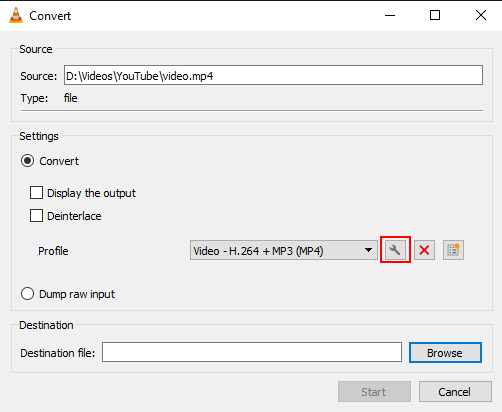
Click on the wrench button next to the profile selection menu button.
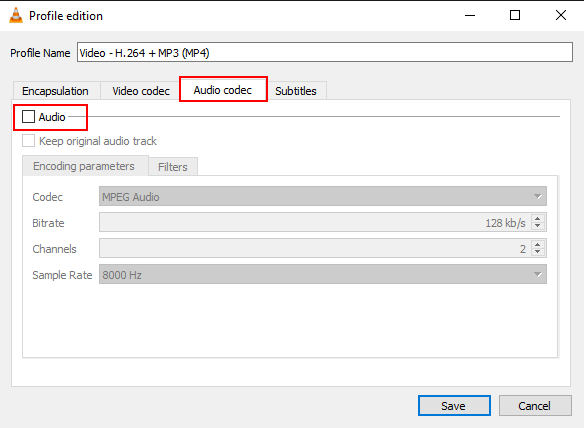
- In the next window, you click on Audio codec.
-
Remove the checkmark from the Audio option.
- Click on Save.
-
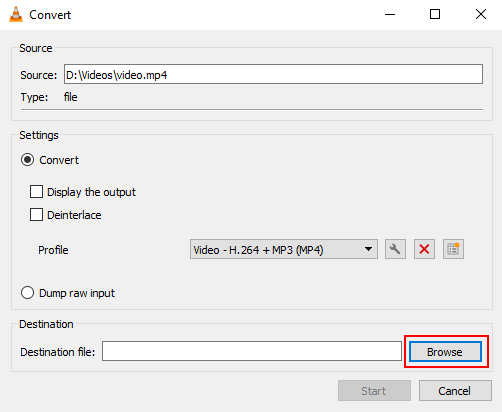
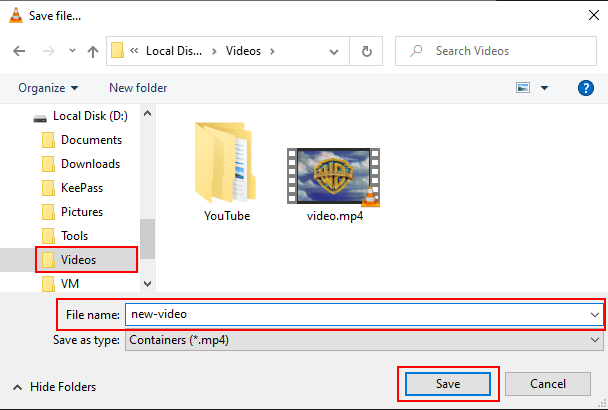
Click on Browse.
- In the next window, you select a location on your computer where you want to save the new video.
- At File name, you type a name for the video.
-
Click on Save.
-
Click on the Start button.
VLC media player will now convert your video to another video.
The result will be a new video without sound.
The original video will not be affected.
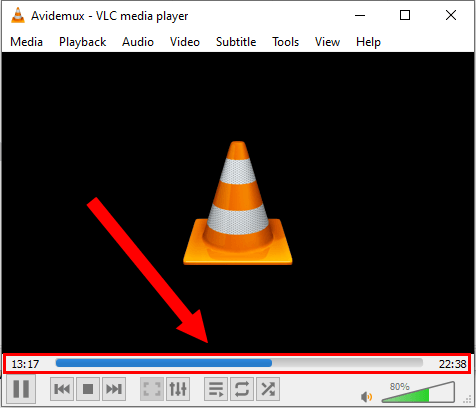
You can see the progress at the bottom of VLC.
How to remove sound from a video using Shotcut
Shotcut is a free, open-source, cross-platform video editor for Microsoft Windows, Linux, and macOS.
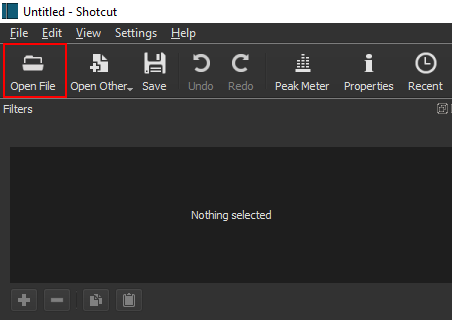
- Open Shotcut.
-
Click on Open File in the top left corner.
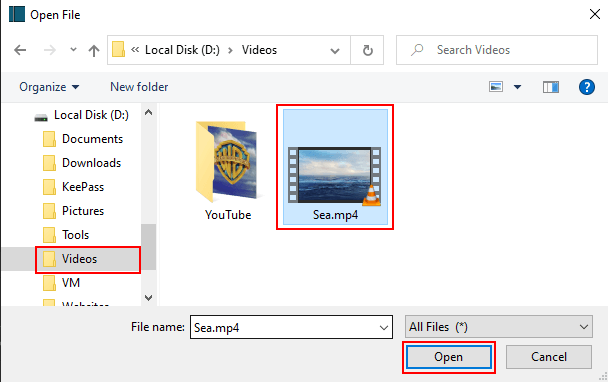
- In the next window, you go to the video you want to edit.
- Select the video.
-
Click on Open.
-
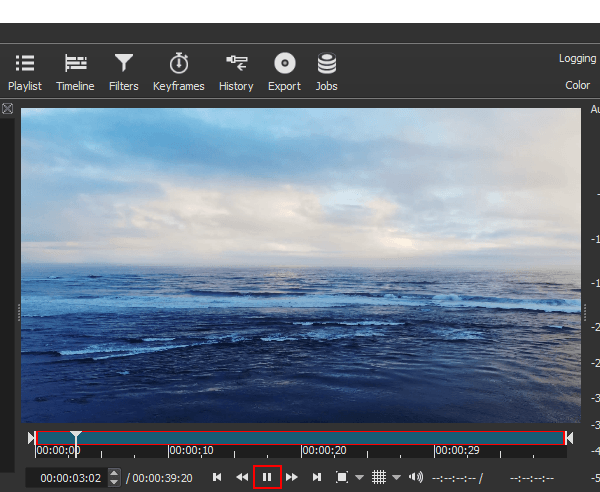
The video will start playing immediately. You can pause the video by clicking on the pause button below the video.
-
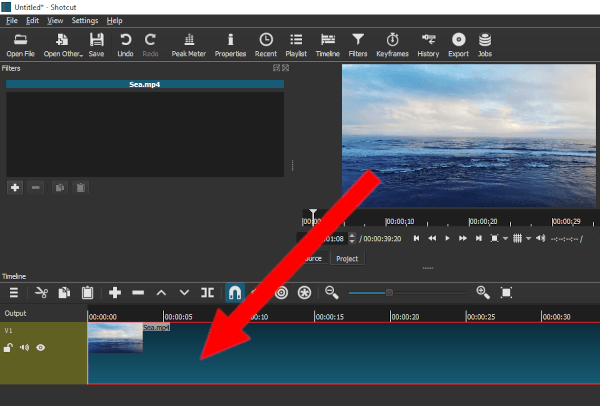
Drag the video to the timeline.
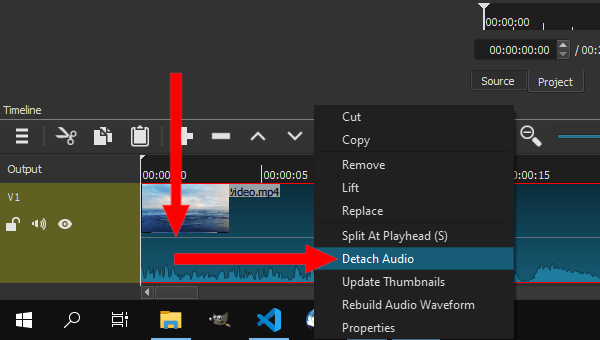
- Right-click on the video.
-
Click on Detach Audio.
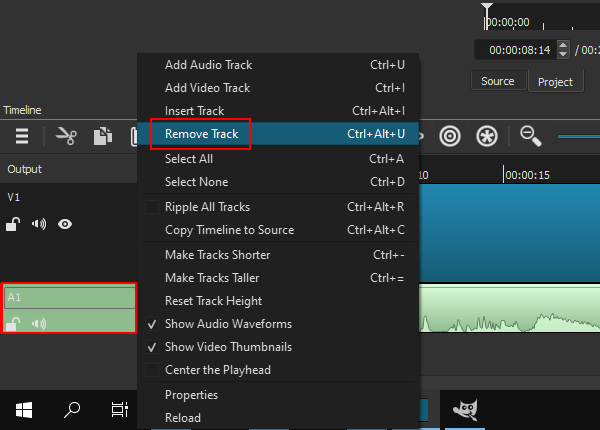
- Right-click on the audio track below the video track.
-
Click on Remove Track.
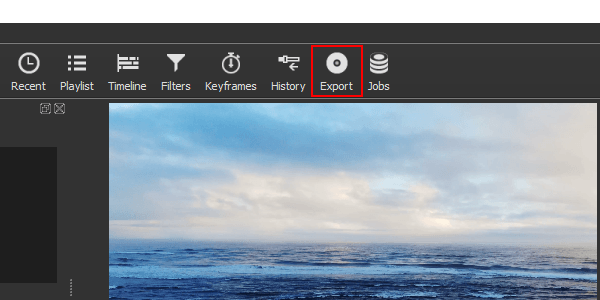
-
Click on Export located in the top menu.
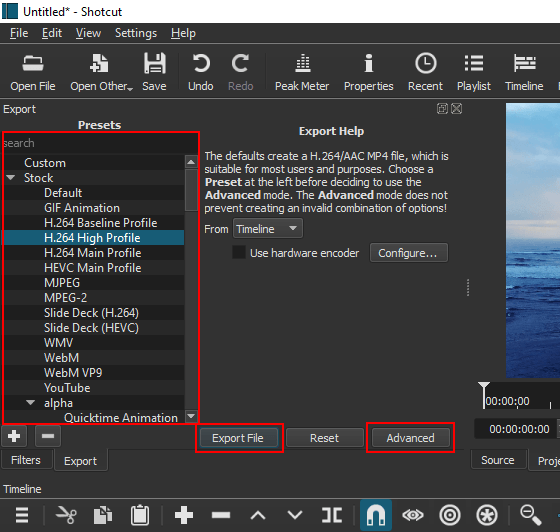
- In the 'Export' panel, you select a video format in the 'Presets' section.
- If you want more advanced settings, you click on Advanced.
-
Click on Export File.
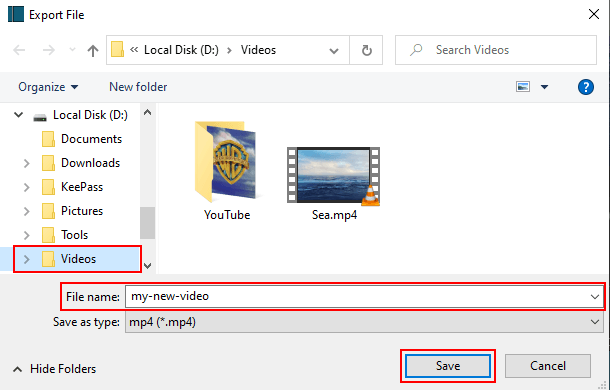
- In the next window, you select a location on your computer where you want to save the video.
- At File name, you type a name for the video.
-
Click on Save.
Shotcut will now create your video.
The result will be a new video without sound.
The original video will not be affected.
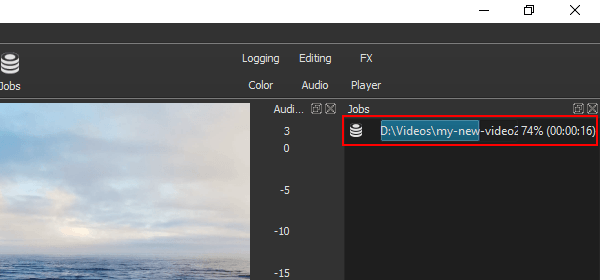
You can see the progress at Jobs located in the top right corner.
How to remove sound from a video using HandBrake
HandBrake is a free, open-source, cross-platform video converter for Windows, Linux, and macOS.
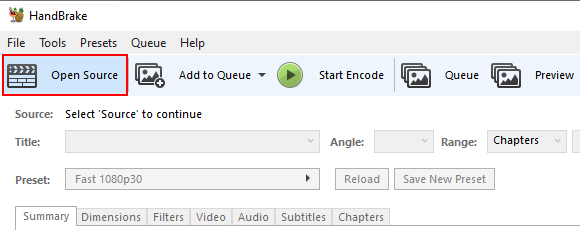
- Open HandBrake.
-
Click on Open Source located in the top left corner.
-
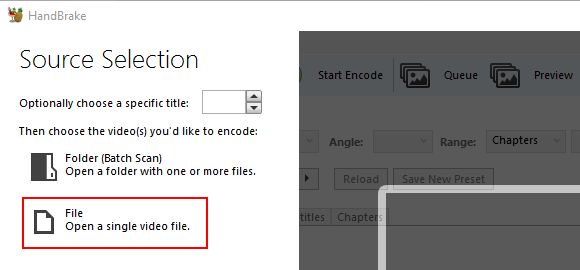
Click on File.
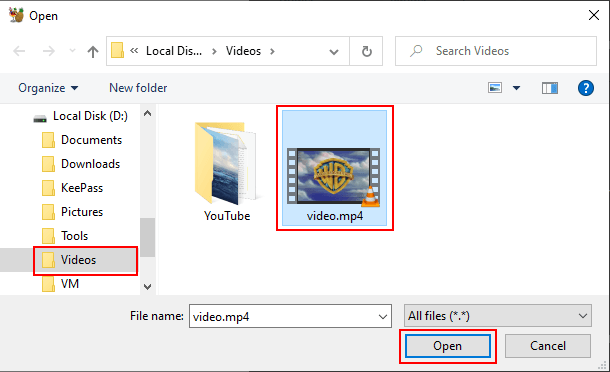
- In the next window, you go to the video you want to edit.
- Select the video.
-
Click on Open.
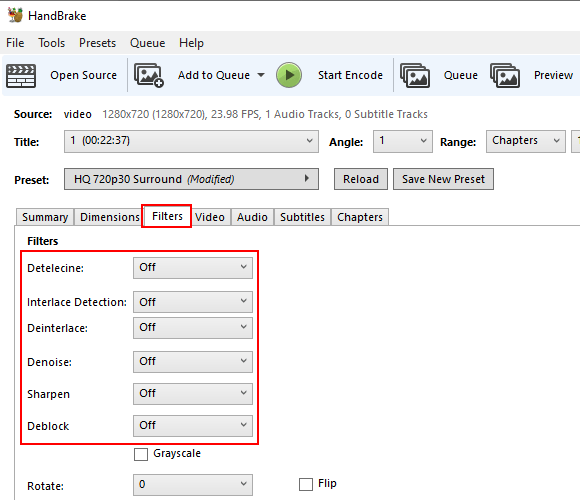
- Click on the Filters tab.
-
Disable all filters.
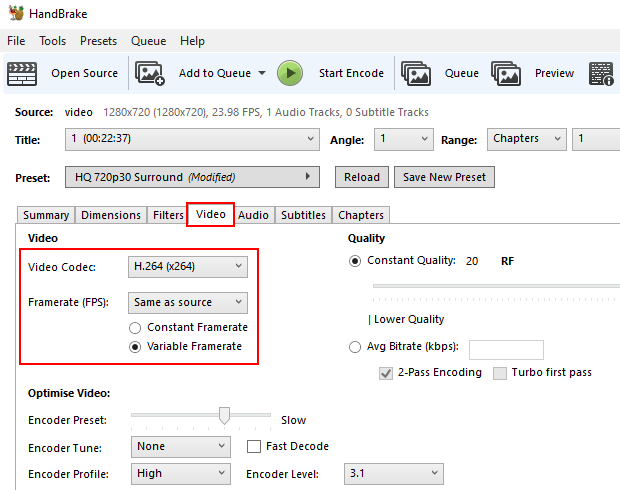
- Click on the Video tab.
- At Video Codec, you select H.264 (x264).
- At Framerate (FPS), you select Same as source.
-
Make sure the Variable Framerate option is selected.
-
At Quality, you can change the quality using the slider.
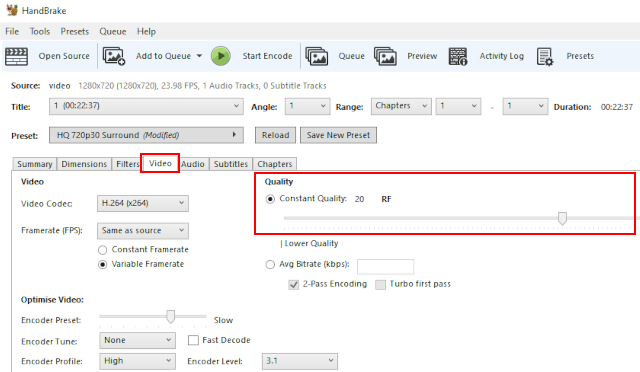
A lower RF number produces higher quality video, and a higher RF number produces lower quality video.
In this example, I'm using a 720p video, so I'm setting the RF to 20.
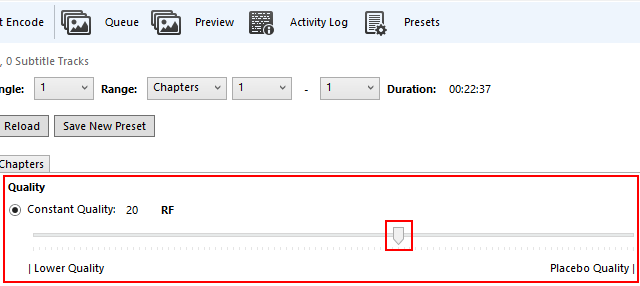
Begin by making small adjustments. Plus or minus 1 or 2 RF is usually noticeable.
Recommended settings for x264 and x265 encoders:
- RF 18-22 for 480p/576p Standard Definition
- RF 19-23 for 720p High Definition
- RF 20-24 for 1080p Full High Definition
- RF 22-28 for 2160p 4K Ultra High Definition
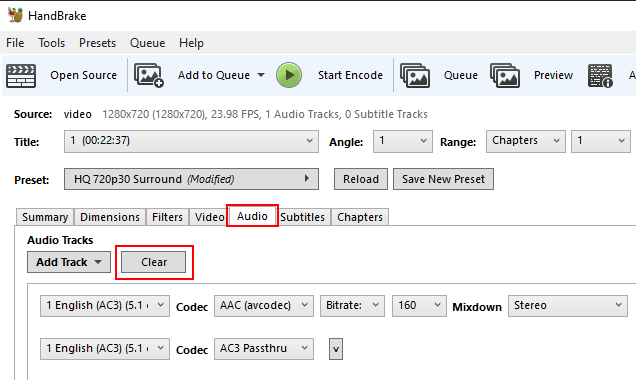
- Click on the Audio tab.
-
Click on Clear to delete all audio tracks.
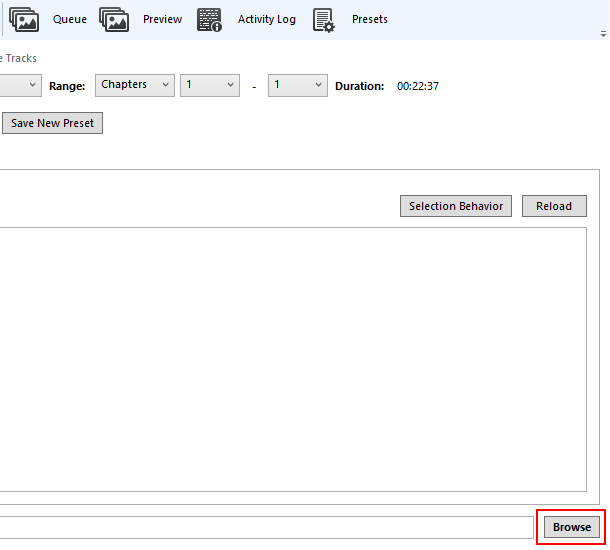
-
Click on Browse in the bottom right corner of HandBrake.
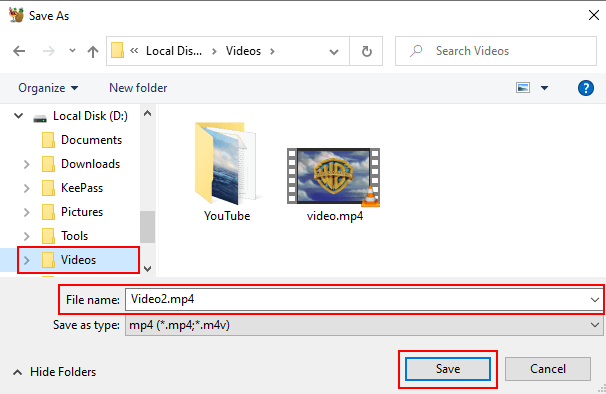
- In the next window, you select a location on your computer where you want to save the video.
- At File name, you type a name for the video with .mp4 or .mkv at the end of the file name.
-
Click on Save.
-
Click on Start Encode located in the top menu of HandBrake.
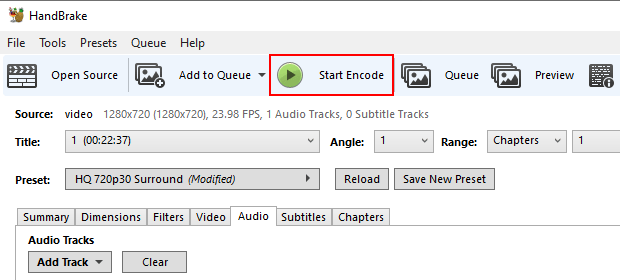
HandBrake will now convert your video to another video.
The result will be a new video without sound.
The original video will not be affected.
You can see the progress at the bottom of HandBrake.

How to remove sound from a video using Clipchamp
Clipchamp is available as a built-in video editing and recording app for Windows 11 and a downloadable app for Windows 10.
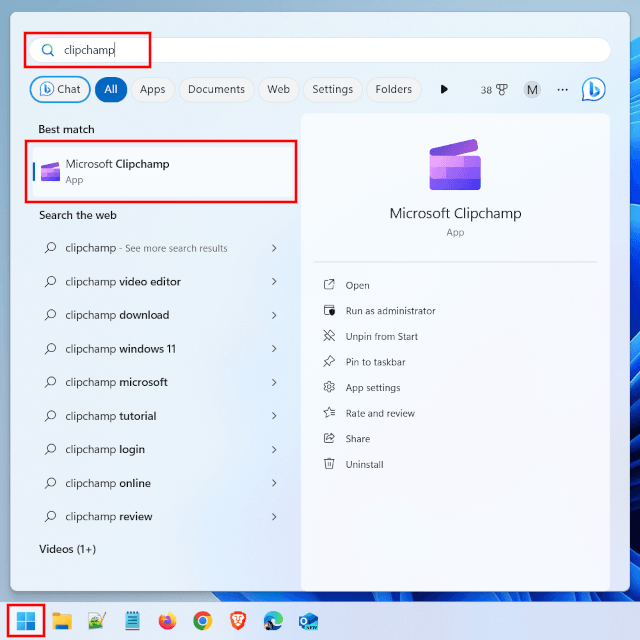
- Click on the Windows start menu button or search icon located in the taskbar.
- Type clipchamp.
-
Click Microsoft Clipchamp.
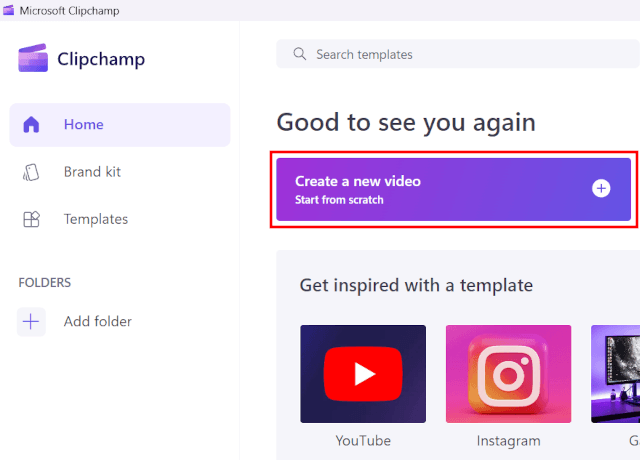
-
Click Create a new video.
- Click on the (+) button in the top left corner of Clipchamp.
-
Click on Browse files.

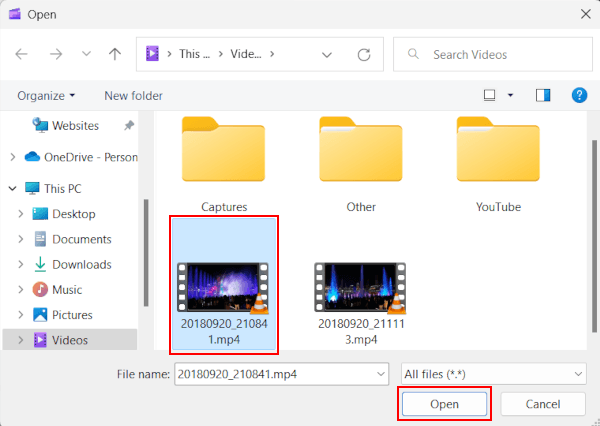
- In the next window, you go to the video you want to edit.
- Select the video.
-
Click on Open.
-
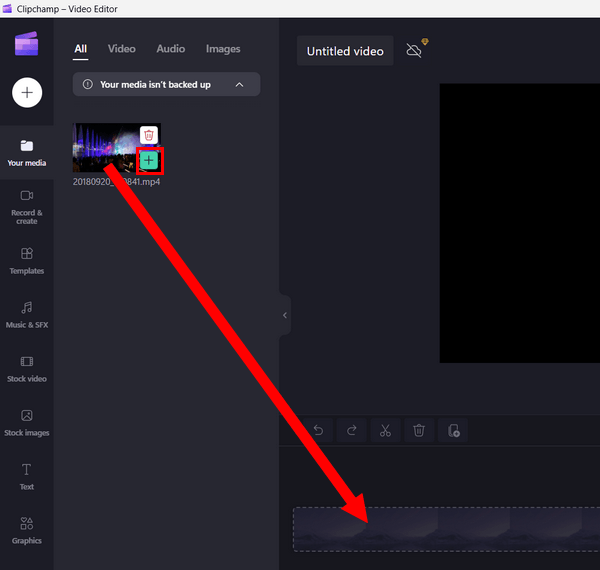
Drag and drop the video to the timeline, or hover your mouse pointer over the video and click on the plus icon.
- Right-click on the video in the timeline.
- Go to Audio.
-
Click on Detach.
- Right-click on the audio track below the video track.
-
Click on Delete.
- Click on the Export button in the top right corner.
-
Select a video quality.
Clipchamp will now create your video.
The result will be a new video without sound.
The original video will not be affected.
Clipchamp will save the new video in the 'Downloads' folder on your PC.
How to remove sound from a video using Filmora
Filmora is an easy-to-use video editor with a lot of video-editing tools.
I'm using Filmora video editor to record my computer's screen and create videos for my YouTube channel.
- Open Filmora.
-
Click on Create New Project.

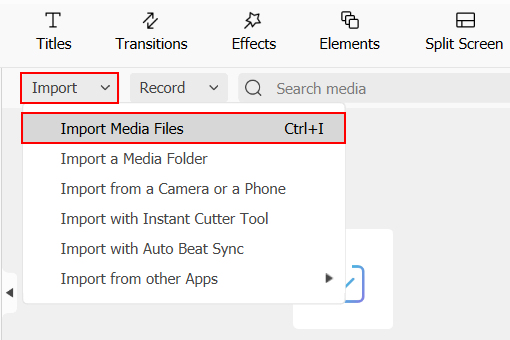
- Click on Import.
-
Click on Import Media Files.
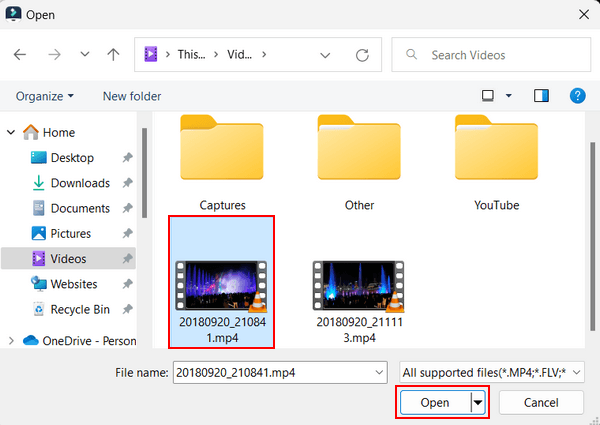
- In the next window, you go to the video you want to edit.
- Select the video.
-
Click on Open.
-
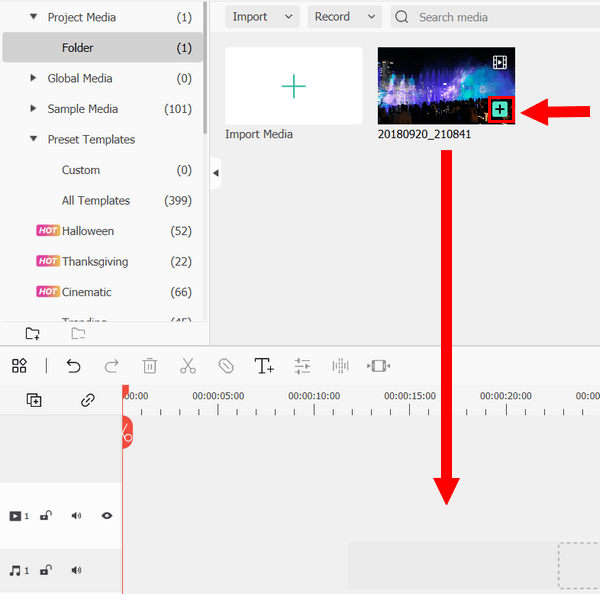
Drag and drop the video to the timeline, or hover your mouse pointer over the video and click on the plus icon.
-
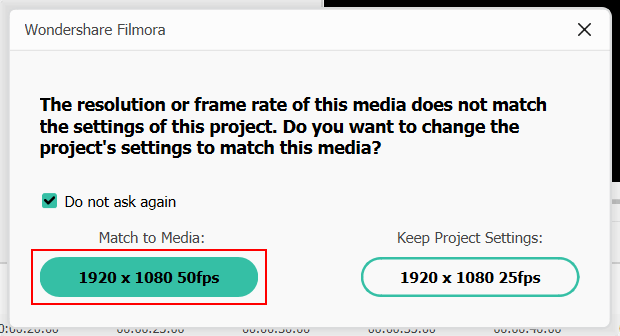
When you get the message 'The resolution or frame rate of this media does not match the settings of this project.', you click on the button below Match to Media.
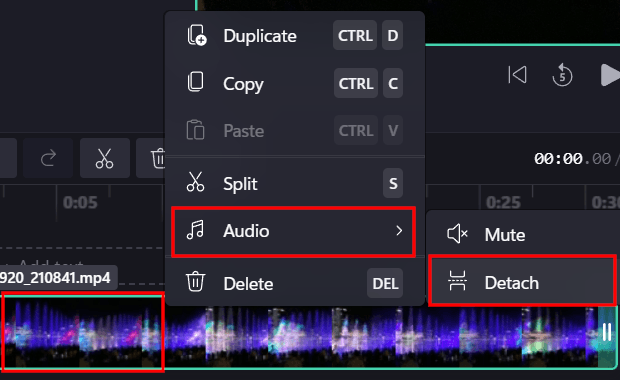
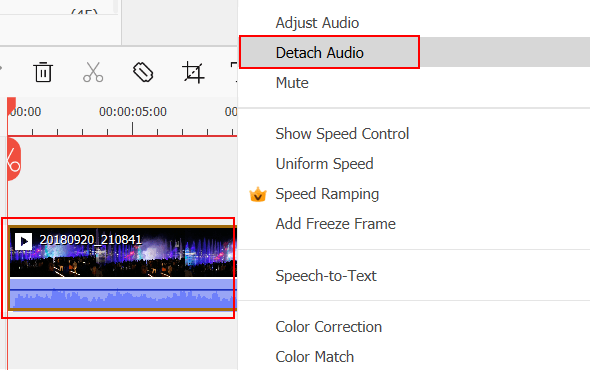
- Right-click on the video in the timeline.
-
Click on Detach Audio.
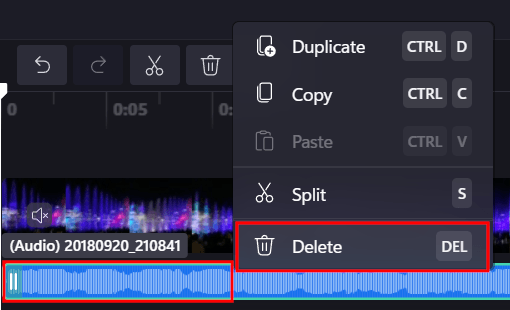
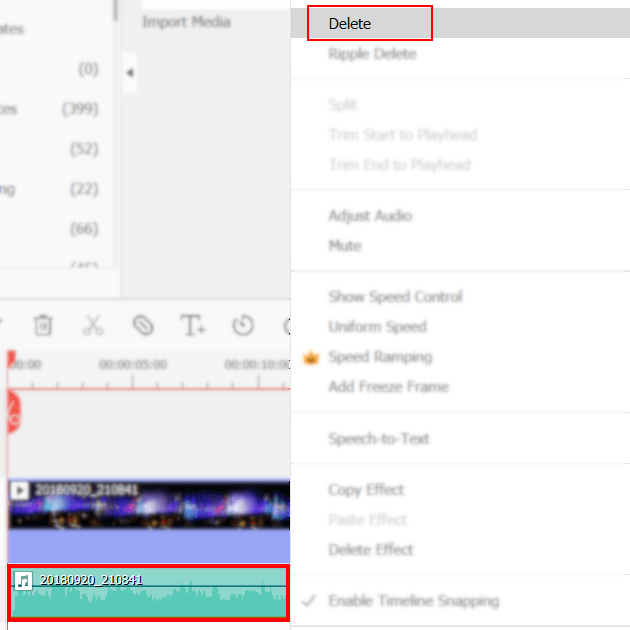
- Right-click on the audio track below the video.
-
Click on Delete.
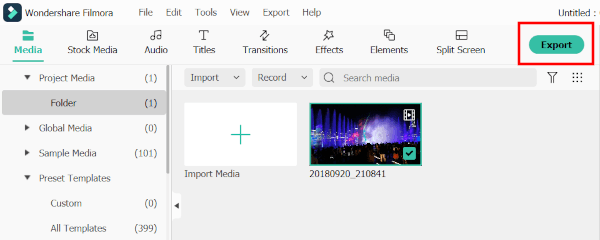
-
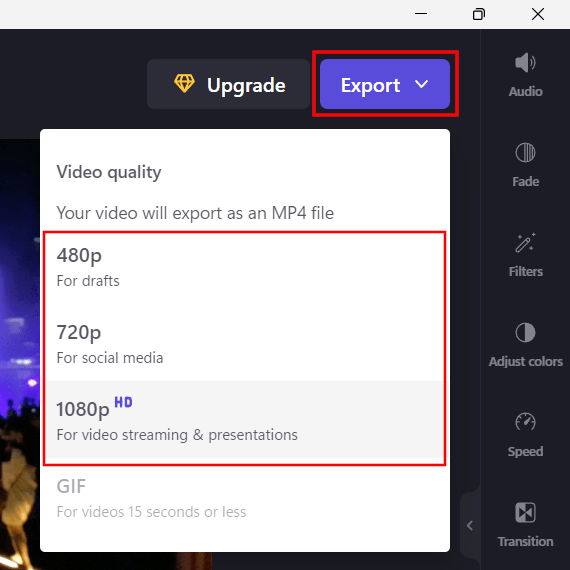
Click on the Export button in the top toolbar.
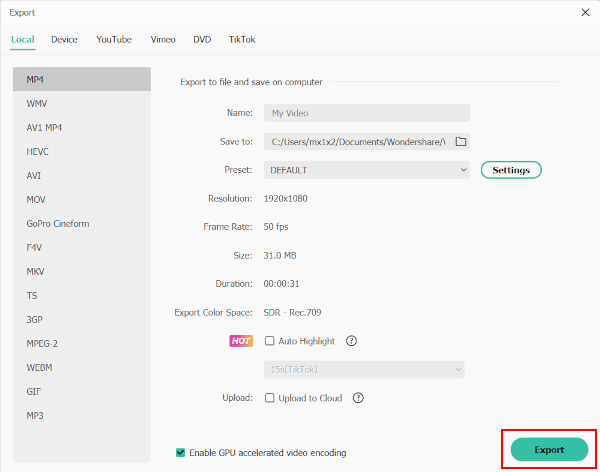
- In the next window, you can enter a name for your video.
- Select a video format.
-
Click on Export.
Filmora will now create your video.
The result will be a new video without sound.
The original video will not be affected.
Filmora will save the new video in the following location on your PC: Documents/Wondershare/Wondershare Filmora/Output.
Related: