How to Zip, RAR, and password protect files in Windows 11
This step-by-step tutorial will show you how to compress files, create a RAR archive, and make a password-protected ZIP file in Windows 11. While the operating system can handle basic file compression right out of the box, you will need a couple of lightweight utilities to unlock advanced formatting and secure data encryption.
You do not need to buy any premium software to protect or compress your data. This guide will walk you through using the native Windows 11 right-click menu for standard ZIP files, using the free tool 7-Zip to lock your private data with a password, and using WinRAR to bundle files into a RAR archive.
How to create a standard ZIP file (native Windows 11 method)
Windows 11 includes native support for file compression directly inside File Explorer. You do not need to install any third-party utilities to create a basic ZIP archive.
- Open File Explorer.
- Go to the files or folders you want to compress into a ZIP file.
- Highlight and select the files or folders.
- Right-click on the selected files or folders.
- Hover your mouse over Compress to.
- Select ZIP File.
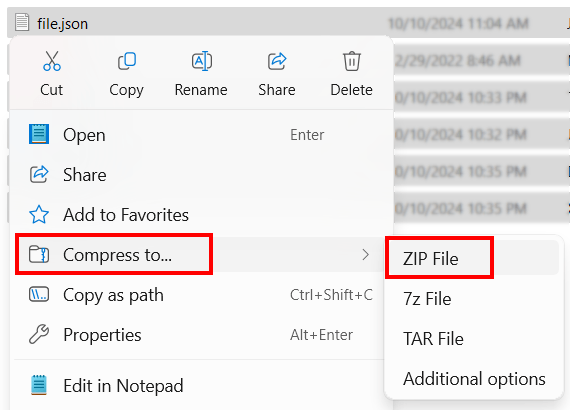
Windows will instantly generate a new ZIP archive in the same folder. The file name will be highlighted automatically so you can type a new name for it right away.
How to create a password-protected ZIP file using 7-Zip
Windows 11 cannot create password-protected archives natively. To encrypt your data, you will need the free, lightweight utility 7-Zip. You can download and install 7-Zip from the official 7-zip.org website.
- Open File Explorer.
- Navigate to the files or folders you want to compress into a ZIP file and protect with a password.
- Highlight and select the files or folders.
- Right-click on the selected files or folders.
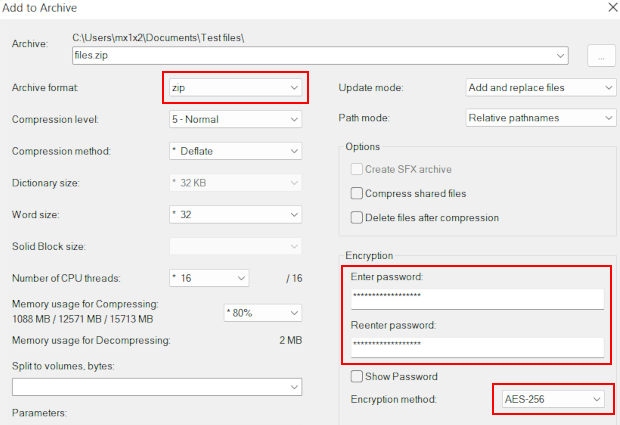
- Click Show more options.
- Hover your mouse over 7-Zip.
- Click Add to archive.
- In the window that opens, set the Archive format dropdown to zip.
- In the Encryption section, type your password into both text fields.
- Set the Encryption method dropdown menu to AES-256 for maximum security.
- Click OK at the bottom of the window to generate your secure ZIP file.
How to create a RAR file using WinRAR
RAR is a proprietary compression format that offers advanced data compression and error correction features. Because the creation rights for RAR are closed-source, you must use the official tool WinRAR to pack files into a RAR archive. You can download and install WinRAR from the official WinRAR website.
Note: WinRAR is technically a paid tool with a 40-day evaluation period. However, once the 40 days expire, the software remains completely functional for free; you will simply see a friendly reminder pop-up to buy a license whenever you open the app interface.
- Open File Explorer.
- Navigate to the files or folders you want to compress into a RAR file.
- Highlight and select the files or folders.
- Right-click on the selected files or folders.
- Hover your mouse over WinRAR in the context menu.
-
Click on Add to "Filename.rar" from the sub-menu.
Tip: If you do not see WinRAR in your initial right-click menu, click Show more options at the bottom of the menu first.

WinRAR will instantly generate a new RAR archive in the same folder.
Related:
How to open ZIP, RAR, or 7Z files on Windows 11 (No Software)