What to do when the Windows 10 or 11 start menu button isn't working
Windows 10 or 11 start menu button not working? Here are a few solutions you can try to fix the problem.
How to fix the Windows 10 start menu button
Solution 1: Restart the 'Start' process
- Open Windows Task Manager by pressing the Ctrl + Shift + Esc (Escape) keys on your keyboard simultaneously.
- If the 'User Account Control' window appears, you click Yes. Depending on your settings, you may need to enter your administrator password first and then click Yes.
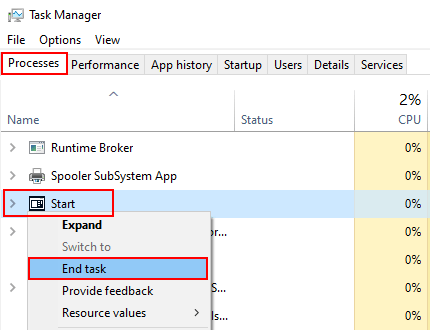
- In the 'Processes' tab, you right-click on Start.
-
Click on End task.
- Windows 10 will automatically start the 'Start' process again. You can now close the Task Manager window.
- Check if the Windows start menu is working. If not, try the next solution.
Solution 2: Restart the 'Windows Explorer' process
- Open Windows Task Manager by pressing the Ctrl + Shift + Esc (Escape) keys on your keyboard simultaneously.
- If the 'User Account Control' window appears, you click Yes. Depending on your settings, you may need to enter your administrator password first and then click Yes.
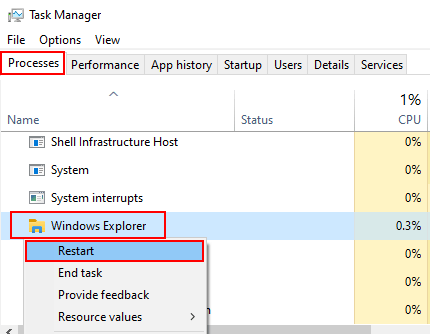
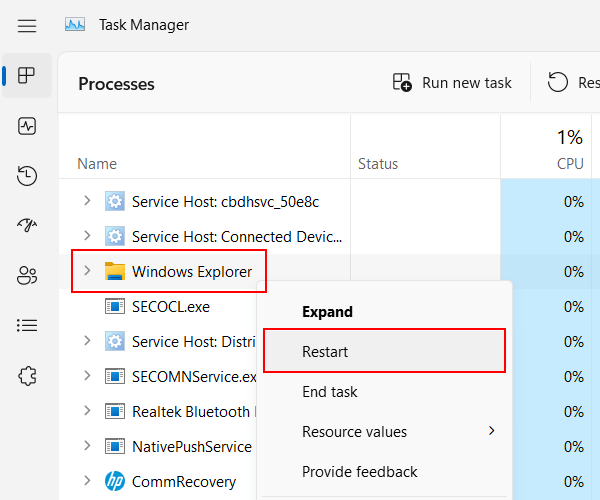
- In the 'Processes' tab, you right-click on Windows Explorer.
-
Click on Restart.
- Windows 10 will restart the 'Windows Explorer' process. You can now close the Task Manager window.
- Check if the Windows start menu is working. If not, try the next solution.
Solution 3: System File Checker
To fix problems on Windows 10, you can use the DISM and SFC tools to replace missing and corrupted system files.
System File Checker (SFC) is a Windows utility that allows users to scan for corruptions in Windows system files and restore corrupted files.
-
Press the Windows
 + X keys on your keyboard to open the WinX menu.
- In the WinX menu, you click on Command Prompt (Admin).
- When the User Account Control (UAC) window appears, you click Yes. Depending on your settings, you might need to enter your administrator password first and then click Yes.
-
In the Command Prompt window, you type
sfc /scannow.
- Press the Enter key on your keyboard.
- The System File Checker tool will scan all protected system files, and replace corrupted files with a cached copy. This process may take a while. Wait for the process to finish.
- When the System File Checker is finished, you close the Command Prompt window.
- Restart your PC.
Note: If the System File Checker tool is unable to fix corrupt files, go to the following page: How to fix 'SFC unable to fix corrupt files' in Windows 10 and 11.
Solution 4: DISM
DISM (Deployment Image Servicing and Management) is a tool for troubleshooting and repairing Windows 10 system images.
-
Press the Windows + X keys on your keyboard to open the WinX menu.
- In the WinX menu, you click on Command Prompt (Admin).
- If the 'User Account Control' window appears, you click Yes. Depending on your settings, you may need to enter your administrator password first and then click Yes.
-
In the Command Prompt window, you type the following command.
DISM /Online /Cleanup-Image /CheckHealth - Press the Enter key on your keyboard.
- Wait for the command to finish.
-
Type the following command.
DISM /Online /Cleanup-Image /ScanHealth - Press the Enter key on your keyboard.
- Wait for the command to finish.
-
Type the following command.
DISM /Online /Cleanup-Image /RestoreHealth - Press the Enter key on your keyboard.
- When the DISM scan is complete, you close the Command Prompt window.
- Restart your PC.
Solution 5: Reset PC
Windows 10 has a feature that allows you to reinstall and update the Windows operating system in just a few clicks.
Important! Even though it says that it allows you to keep your files, I still recommend backing up your files, and if you have paid software, you should also retrieve and back up the license keys. Just in case something goes wrong.
Steps
-
Open settings by pressing the Windows + I keys on your keyboard simultaneously.
- Click on Update & Security.
- Click on Recovery in the left menu.
- Under 'Reset this PC', you click on Get started.
- If the 'User Account Control' window appears, you click Yes. Depending on your settings, you may need to enter your administrator password first and then click Yes.
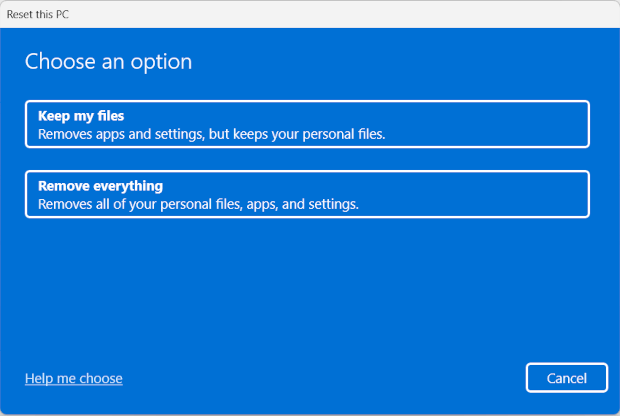
-
In the 'Reset this PC' window, you choose one of the two following options: Keep my files or Remove everything.
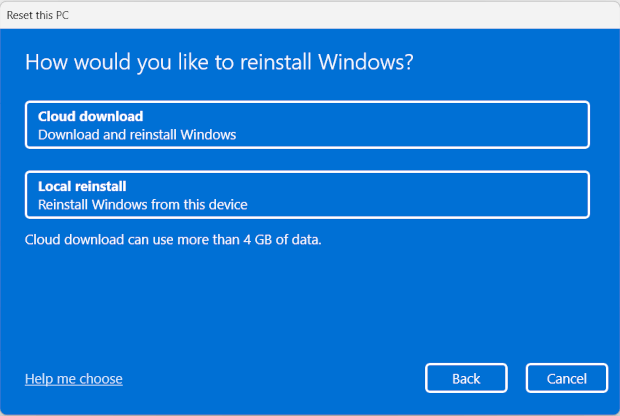
-
In the next window, you choose the Cloud download option.
-
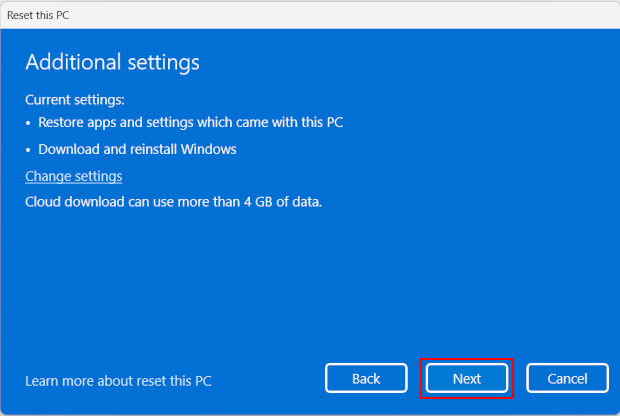
In the next window, you can check your choices. Click Next to continue.
-
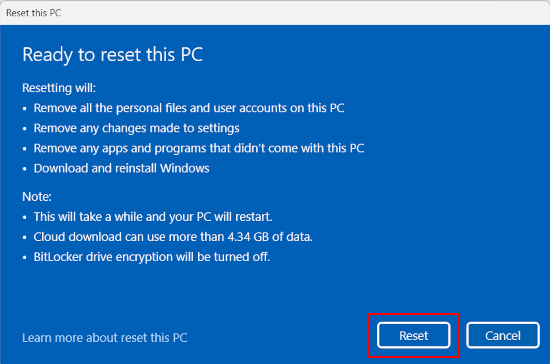
In the next window, you can check your choices again. Click Reset to continue.
- Follow the on-screen instructions to reinstall Windows 10.
How to fix the Windows 11 start menu button
Solution 1: Restart the 'Start' process
- Open Windows Task Manager by pressing the Ctrl + Shift + Esc (Escape) keys on your keyboard simultaneously.
- If the 'User Account Control' window appears, you click Yes. Depending on your settings, you may need to enter your administrator password first and then click Yes.
- In the 'Processes' tab, you right-click on Start.
-
Click on End task.

- Windows 11 will automatically start the 'Start' process again. You can now close the Task Manager window.
- Check if the Windows start menu is working. If not, try the next solution.
Solution 2: Restart the 'Windows Explorer' process
- Open Windows Task Manager by pressing the Ctrl + Shift + Esc (Escape) keys on your keyboard simultaneously.
- If the 'User Account Control' window appears, you click Yes. Depending on your settings, you may need to enter your administrator password first and then click Yes.
- In the 'Processes' tab, you right-click on Windows Explorer.
-
Click on Restart.
- Windows 11 will restart the 'Windows Explorer' process. You can now close the Task Manager window.
- Check if the Windows start menu is working. If not, try the next solution.
Solution 3: System File Checker
To fix problems on Windows 11, you can use the System File Checker tool to replace missing and corrupted system files.
System File Checker (SFC) is a Windows utility that allows users to scan for corruptions in Windows system files and restore corrupted files.
-
Press the Windows + X keys on your keyboard to open the WinX menu.
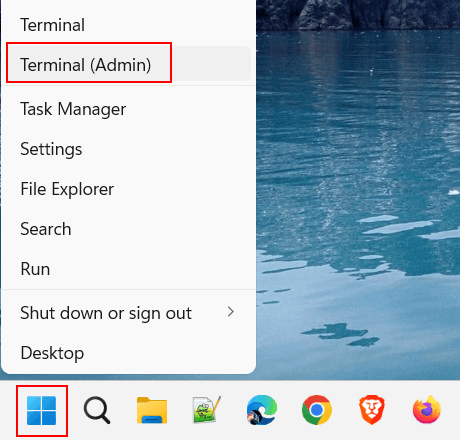
-
In the WinX menu, you click on Terminal (Admin).
- When the User Account Control (UAC) window appears, you click Yes. Depending on your settings, you might need to enter your administrator password first and then click Yes.
-
In the Terminal window, you type
sfc /scannow. - Press the Enter key on your keyboard.
- The System File Checker tool will scan all protected system files, and replace corrupted files with a cached copy. This process may take a while. Wait for the process to finish.
- When the System File Checker is finished, you close the Terminal window.
- Restart your PC.
Note: If the System File Checker tool is unable to fix corrupt files, go to the following page: How to fix 'SFC unable to fix corrupt files' in Windows 10 and 11.
Solution 4: DISM
DISM (Deployment Image Servicing and Management) is a tool for troubleshooting and repairing Windows 11 system images.
-
Press the Windows + X keys on your keyboard to open the WinX menu.
-
In the WinX menu, you click on Terminal (Admin).
- When the User Account Control (UAC) window appears, you click Yes. Depending on your settings, you might need to enter your administrator password first and then click Yes.
-
In the Terminal window, you type the following command.
DISM /Online /Cleanup-Image /CheckHealth - Press the Enter key on your keyboard.
- Wait for the command to finish.
-
Type the following command.
DISM /Online /Cleanup-Image /ScanHealth - Press the Enter key on your keyboard.
- Wait for the command to finish.
-
Type the following command.
DISM /Online /Cleanup-Image /RestoreHealth - Press the Enter key on your keyboard.
- After the DISM scan is complete, you close the Terminal window.
- Restart your PC.
Solution 5: Reset PC
Windows 11 has a feature that allows you to reinstall and update the Windows operating system in just a few clicks.
Important! Even though it says that it allows you to keep your files, I still recommend backing up your files, and if you have paid software, you should also retrieve and back up the license keys. Just in case something goes wrong.
Steps
-
Open settings by pressing the Windows + I keys on your keyboard simultaneously.
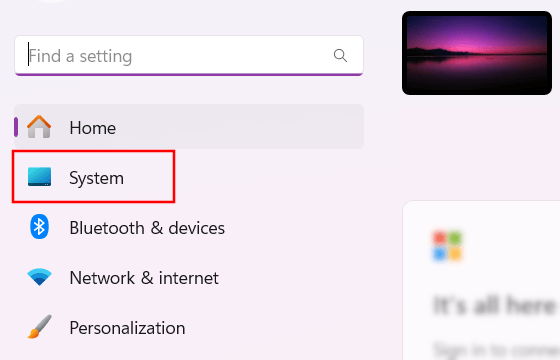
-
Click on System in the left menu.
-
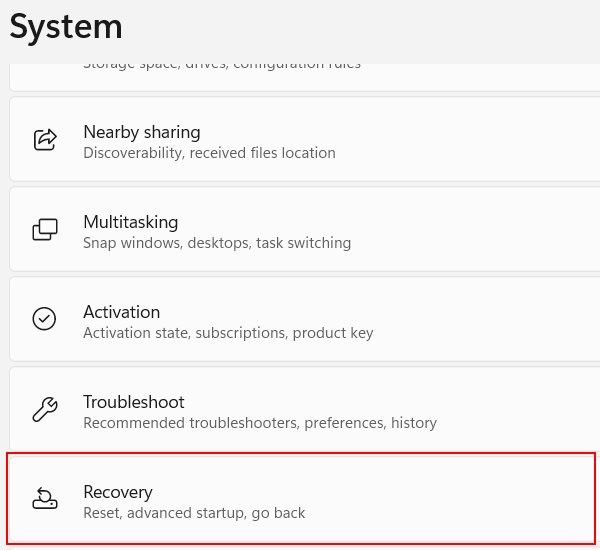
Click on Recovery.
-
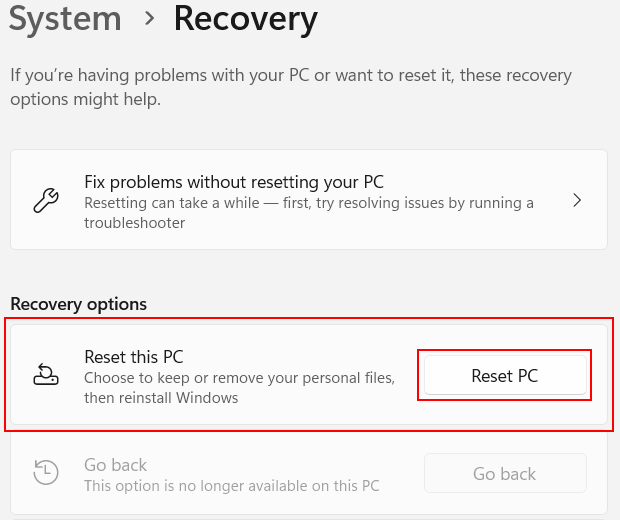
In the 'Recovery options' section, you click on Reset PC.
- If the 'User Account Control' window appears, you click Yes. Depending on your settings, you may need to enter your administrator password first and then click Yes.
-
In the 'Reset this PC' window, you choose one of the two following options: Keep my files or Remove everything.
-
In the next window, you choose the Cloud download option.
-
In the next window, you can check your choices. Click Next to continue.
-
In the next window, you can check your choices again. Click Reset to continue.
- Follow the on-screen instructions to reinstall Windows 11.