How to make File Explorer open 'This PC' in Windows 10 and 11
This step-by-step tutorial will show you how to make File Explorer open to 'This PC' by default in Windows 10 and 11 (instead of 'Quick access' or 'Home').
Make File Explorer open to 'This PC' in Windows 10
-
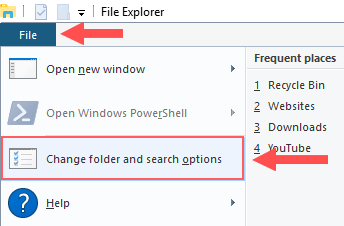
Open File Explorer.

- Click on File located in the top left corner.
-
Click on Change folder and search options.
-
In the next window, you select This PC instead of Quick access at Open File Explorer to.
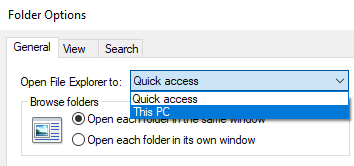
- Click on Apply.
- Click on OK.
File Explorer will now open to 'This PC' instead of 'Quick access'.
Make File Explorer open to 'This PC' in Windows 11
-
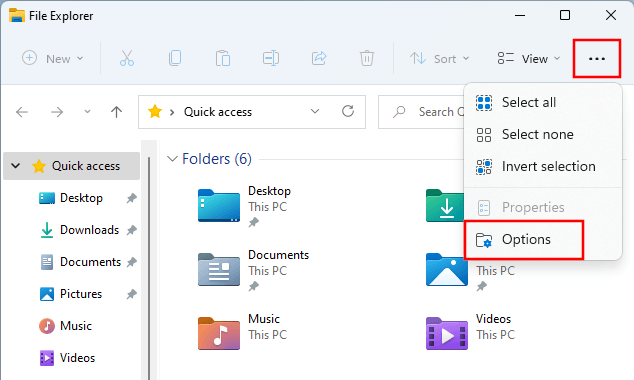
Open File Explorer.

- Click on the three-dot icon located in the top menu of File Explorer.
-
Click on Options.
-
In the next window, you select This PC instead of Home at Open File Explorer to.
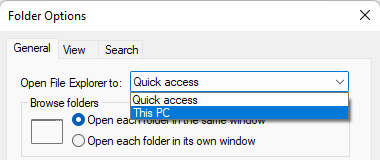
- Click on Apply.
- Click on OK.
File Explorer will now open to 'This PC' instead of 'Home'.
Related:
How to make File Explorer stop grouping files by date
References:
https://www.howtogeek.com/720084/how-to-make-file-explorer-open-to-this-pc-instead-of-quick-access/
https://www.thewindowsclub.com/make-explorer-open-this-pc-quick-access-windows-10