How to rename multiple files at once in Windows 11
If you have a folder full of photos from a recent trip or a batch of downloaded documents with messy, randomized names, renaming them one by one is a massive waste of time. Instead of doing it manually, you can use a built-in Windows 11 trick to rename the entire batch at exactly the same time.
You don't need to download any extra software to do this. I'll show you how to apply a master name to your files, and Windows will automatically organize them with sequential numbers.
Bulk rename your files
- Open File Explorer.
- Go to the folder containing the files you want to rename.
- Select all the files you want to change. (You can click and drag your mouse, hold Ctrl to click specific files, or press Ctrl + A to select everything).
- Right-click on the first file in your selection.
- Click Rename.
- Type in your new desired name (for example: Vacation Photo).
- Press Enter.

Instantly, Windows will apply that name to every file you selected and add a numbered sequence to the end to prevent duplicates. For example, your files will now read as Vacation Photo (1), Vacation Photo (2), Vacation Photo (3), and so on.
Quick tips for bulk renaming
- The undo button: If you make a mistake or accidentally rename the wrong batch of files, don't panic. Just press Ctrl + Z on your keyboard immediately after renaming, and Windows will revert all the files back to their original names.
- Keep sorting in mind: Windows assigns the numbers based on how your folder is currently sorted. If you want the files numbered by date, make sure you sort the folder by "Date modified" before you select and rename them.
- Need find and replace? The native Windows method is great for simple renaming, but it can't do "Find and Replace" (like removing a specific word from 50 files). For advanced bulk renaming, I highly recommend downloading Microsoft's free PowerToys app and using the built-in PowerRename tool.
Advanced: How to "Find and Replace" (using PowerToys)
The native Windows trick is great, but it can't do advanced renaming—like removing a specific word from 50 files or changing file extensions. To do that, you need Microsoft's official, free utility app called PowerToys.
- Download and install PowerToys from the Microsoft Store.
- Open File Explorer and select all the files you want to edit.
- Right-click your selected files and choose Rename with PowerRename from the menu.
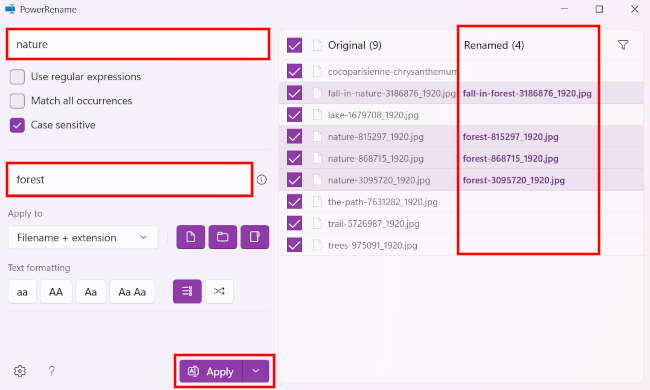
- In the PowerRename window, type the word you want to remove in the Search for box.
- Type your new word in the Replace with box (or leave it blank to just delete the old word).
- Check the preview window to make sure it looks correct, then click Apply.
If you don't like the result, press Ctrl + Z while in the folder containing the files to undo the renaming.
Related:
How to resize multiple photos at once in Windows 10 and 11
How to merge multiple images into one PDF file in Windows 10 & 11