How to rip an Audio CD in Windows 10 and 11
These step-by-step tutorials will show you how to rip an audio CD and copy music from a CD to your computer on Windows 11 and Windows 10. Converting your physical discs into digital audio tracks is the best way to preserve your music collection, recover songs from scratched discs, or transfer albums to a smartphone or portable player.
You don't need any paid third-party software to do this. This guide will walk you through the process using the built-in Windows Media Player for a quick setup, as well as popular free alternatives like Exact Audio Copy (EAC), fre:ac, and VLC to output your music into high-quality MP3, FLAC, or WAV formats.
Ripping an audio CD allows you to back up your music collection, recover tracks from damaged discs, or transfer songs to a mobile phone or portable player. To get started, you will need an internal or external CD drive and a CD ripper program to convert the tracks into standard digital files.
What is the best audio format to rip a CD?
The best format depends on your needs. For identical archive quality, choose a lossless format like FLAC or WAV. For maximum device compatibility and saving storage space, choose MP3 (set to 320 Kbps).
Does ripping a CD damage or affect the disc?
No. Ripping a CD is a strictly read-only process. The laser inside your computer's drive simply reads the data on the disc without altering or damaging it in any way.
Where is the 'Rip CD' button in Windows Media Player?
The Rip CD button appears automatically in the top menu bar of Windows Media Player as soon as you insert an Audio CD into your PC's drive.
How to rip an Audio CD in Windows 10 and 11 using Windows Media Player
- Insert the audio CD you want to rip into the CD drive of your PC.
- Click the Windows start menu button, search icon, or search bar in the taskbar.
- Type wmp.
- Click on Windows Media Player when it appears in the search results.
-
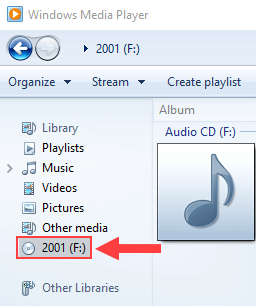
In the left sidebar, click on your CD (e.g., AlbumName (F:)).
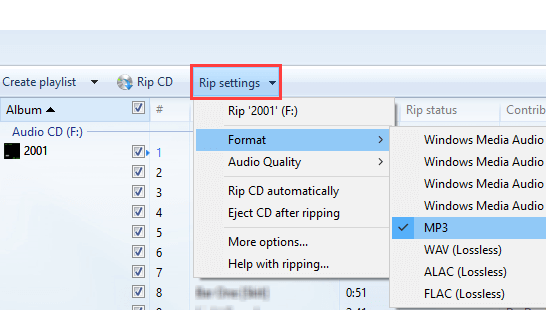
- Click on Rip settings.
- Go to Format.
-
Select MP3 or another audio format, like WMA, WAV or FLAC. FLAC and WAV offer better quality.
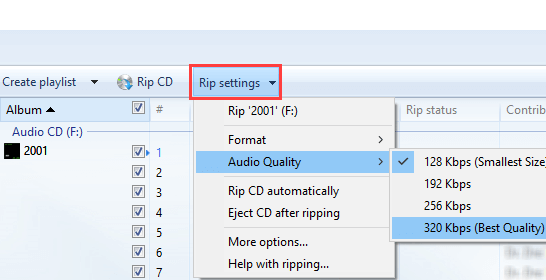
- Click again on Rip settings.
- Go to Audio Quality.
-
Select 320 Kbps. Note: You don't have to select the quality if you've selected FLAC or WAV audio format.
-
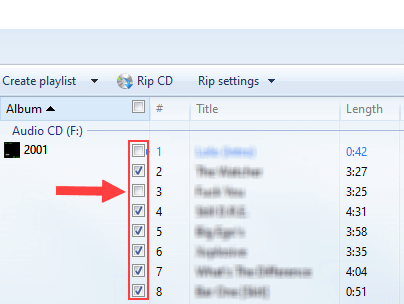
You can uncheck the songs you don't want to rip to your computer.
-
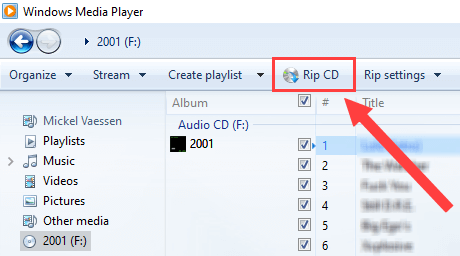
Click on Rip CD located next to Rip settings in the top menu of Windows Media Player.
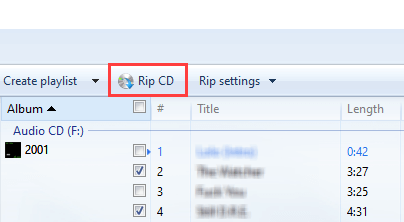
Windows Media Player will now copy the music from your Audio CD to your computer.
Windows Media Player will save your CD in the Music folder on your PC.
How to rip an Audio CD in Windows 10 and 11 using Exact Audio Copy (EAC)
Exact Audio Copy (EAC) is probably the best and most advanced CD ripper. Exact Audio Copy is free.
You can download Exact Audio Copy from fosshub.com.
- Open Exact Audio Copy to begin the one-time setup process.
-
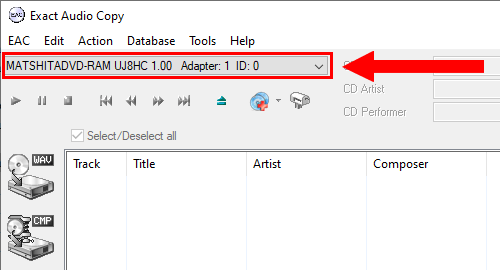
Make sure the CD drive of your PC is selected using the drive selection menu in the top left corner of EAC.
- Insert the audio CD you want to rip into the CD drive of your computer.
- In the 'Configure AccurateRip' window, click on Configure, and AccurateRip will configure the CD/DVD drive.
It will only take a few seconds.
It will make the CD drive work properly with EAC.
This configuration only needs to be done once. Afterward, the drive will stay configured.
AccurateRip improves Audio CD ripping by verifying ripped tracks against an Internet database to ensure they're error-free.
You'll need an older, more popular CD to activate the AccurateRip plugin.
Just try to find a CD that makes the 'Configure AccurateRip' window appear when you insert it into your PC. After the configuration, you can insert the CD you want to rip.
The calibration database contains a lot of CD's. You can use pop, rock, hip-hop, and other classics to configure the CD/DVD drive using AccurateRip.
- When the AccurateRip configuration is complete, click OK.
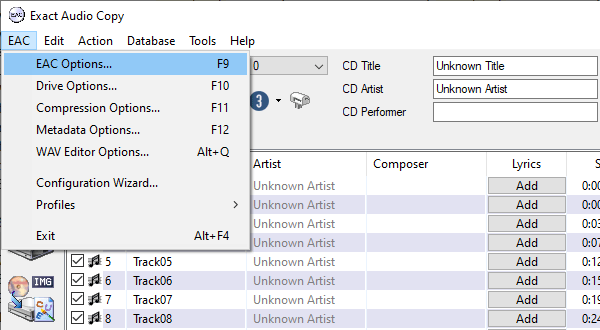
- Click on EAC located in the top left corner.
-
Click on EAC Options.
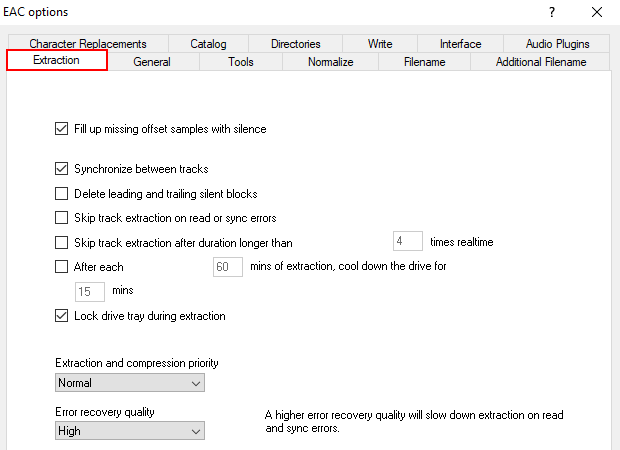
- In the 'EAC Options' window, click on the Extraction tab.
-
Make sure the settings on the Extraction tab are exactly like in the image below.
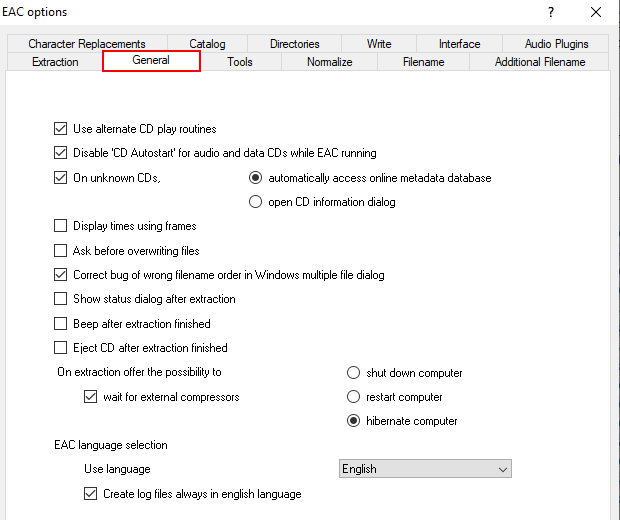
- Click on the General tab.
-
Make sure the settings on the General tab are exactly like in the image below.
- Click on the Tools tab.
-
Make sure the settings on the Tools tab are exactly like in the image below.

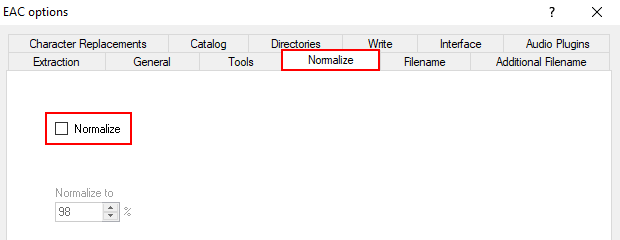
- Click on the Normalize tab.
-
Make sure the Normalize option is off. This option is usually off by default.
- Click on the Filename tab.
-
Here you will see various examples for filenames. Type whatever filename scheme you want into the Use various artist naming scheme field. See image below for an example.
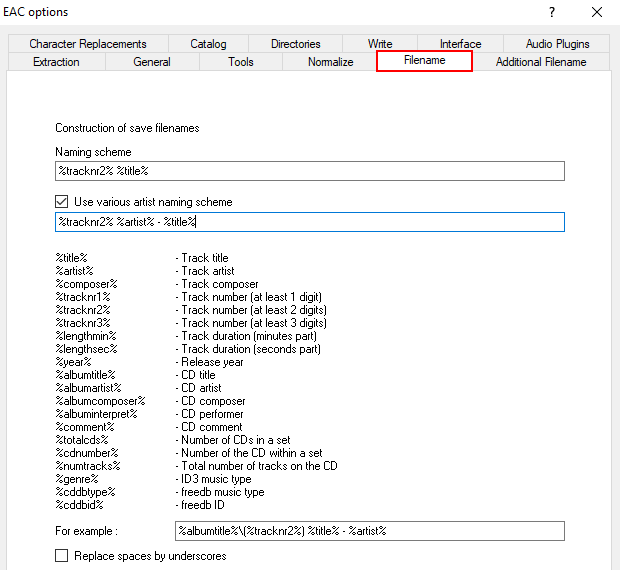
- Make sure the Replace spaces by underscores option at the bottom is disabled.
- Click on OK at the bottom of the settings window.
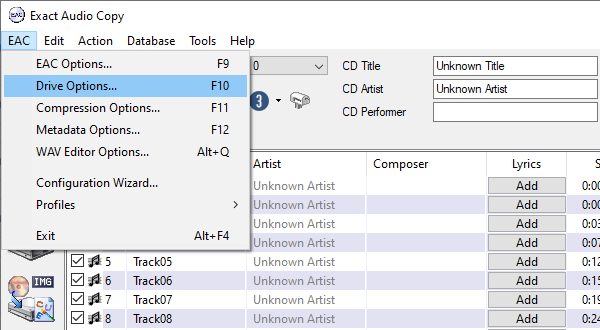
- Click on EAC located in the top left corner.
-
Click on Drive Options.
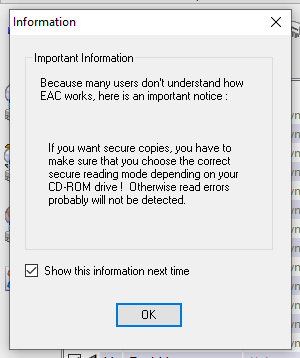
-
If an information/warning window appears, click OK.
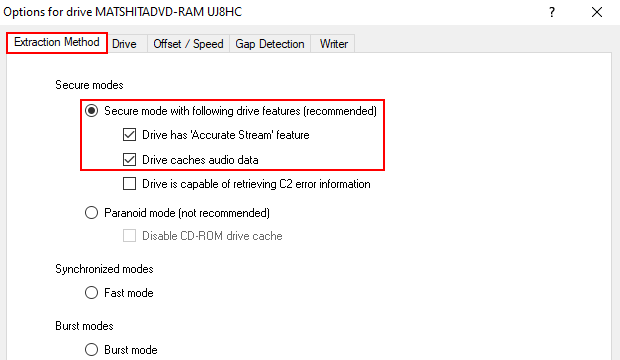
- In the 'Options for drives' window, click on the Extraction Method tab.
- Enable the Secure mode with following drive features option.
- Make sure the Drive has 'Accurate Stream' feature option is enabled.
-
Make sure the Drive caches audio data option is enabled.
- Click on the Drive tab.
- Click on Autodetect read command now, and wait till the read command process is complete and a read command is selected. Your selection might look different than mine. It depends on the CD drive.
-
There are four more options, but you should only select the ones you know your CD drive supports. If your CD drive doesn't support the options, or you don't know, then leave the options unchecked.

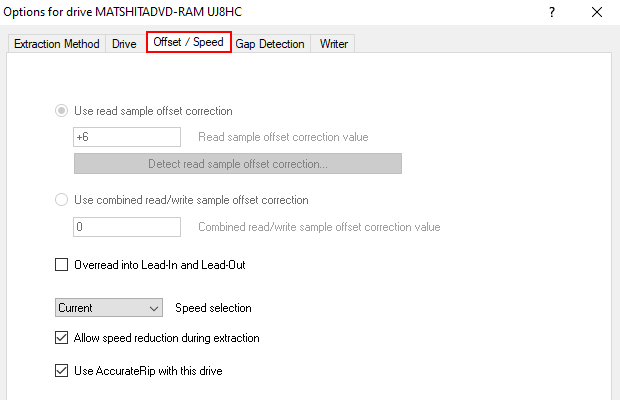
- Click on the Offset / Speed tab.
-
Make sure the settings on the Offset / Speed tab are exactly like in the image below.
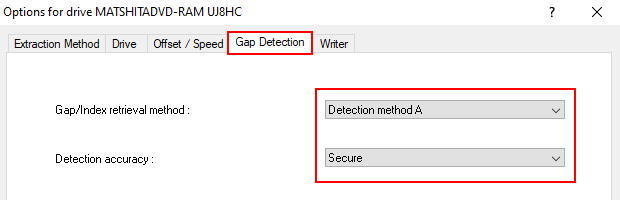
- Click on the Gap Detection tab.
- Select a method at Gab/Index retrieval method.
-
Select either Accurate or Secure at Detection accuracy. I select Secure here.
- Click on OK at the bottom of the settings window.
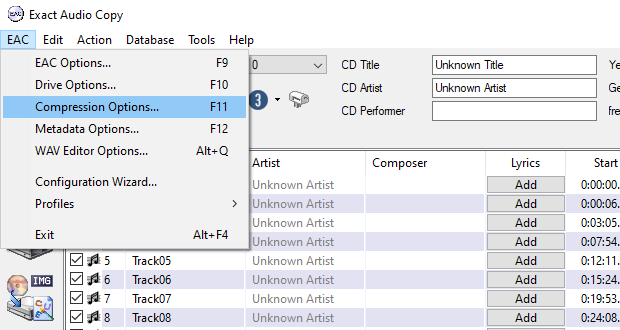
- Click on EAC located in the top left corner.
-
Click on Compression Options.
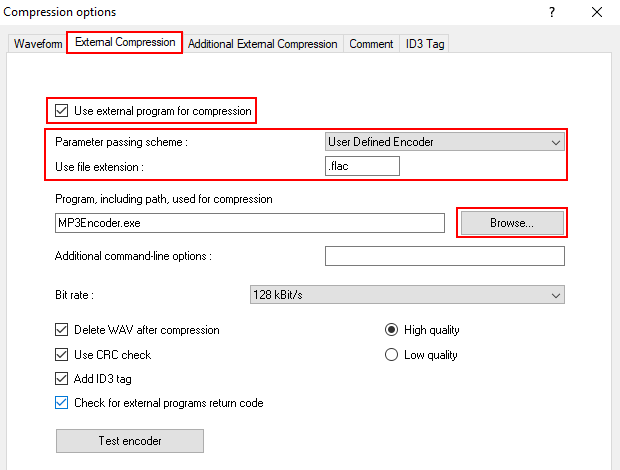
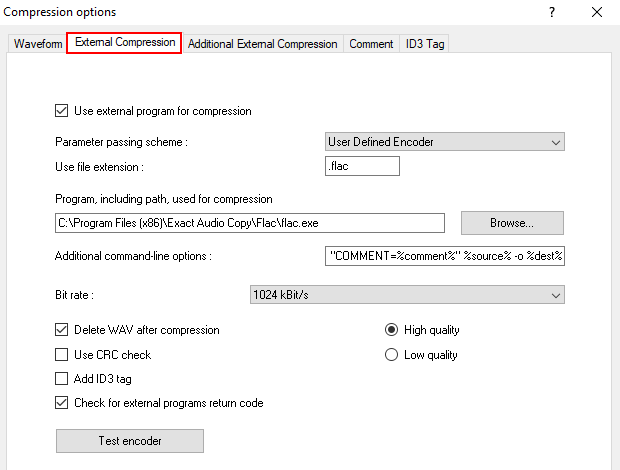
- In the 'Compression Options' window, click on the External Compression tab.
- Enable the Use external program for compression option.
- Select User Defined Encoder.
- Change Use file extension to .flac.
-
At Program, including path, used for compression, click on Browse.
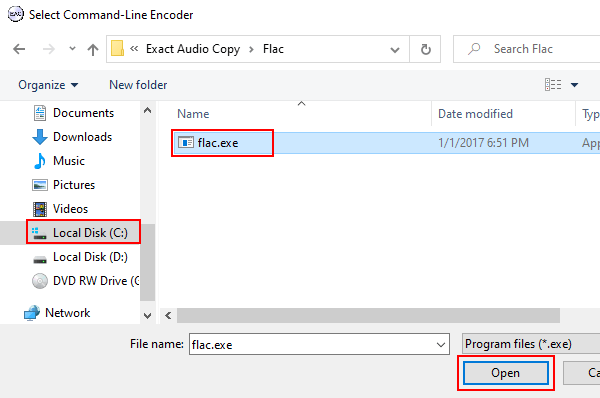
- In the 'Select Command-Line Encoder' window, you go to the location on your computer where the flac.exe file is. Exact Audio Copy comes with an older FLAC encoder in C:\Program Files\Exact Audio Copy\Flac or C:\Program Files (x86)\Exact Audio Copy\Flac. You can also download the latest FLAC encoder from xiph.org.
- Select the flac.exe file.
-
Click on Open.
-
At Additional command-line options, you copy and paste the line below.
-8 -V -T "ARTIST=%artist%" -T "TITLE=%title%" -T "ALBUM=%albumtitle%" -T "DATE=%year%" -T "TRACKNUMBER=%tracknr%" -T "GENRE=%genre%" -T "PERFORMER=%albuminterpret%" -T "COMPOSER=%composer%" %haslyrics%--tag-from-file=LYRICS="%lyricsfile%"%haslyrics% -T "ALBUMARTIST=%albumartist%" -T "DISCNUMBER=%cdnumber%" -T "TOTALDISCS=%totalcds%" -T "TOTALTRACKS=%numtracks%" -T "COMMENT=%comment%" %source% -o %dest% - You can select a bitrate, but actually, it doesn't do anything. So you can choose anything you want here. It doesn't matter.
- Disable the Use CRC check option.
- Disable the Add ID3 tag option.
-
Enable the Check for external programs return code option.
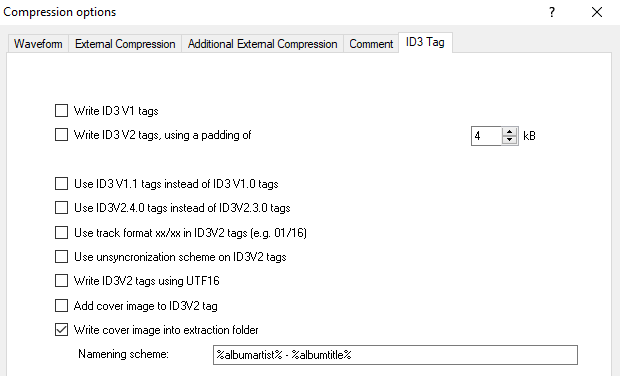
- Click on the ID3 Tag tab.
-
Disable all options except the Write cover image into extraction folder option.
- Click on OK at the bottom of the settings window.
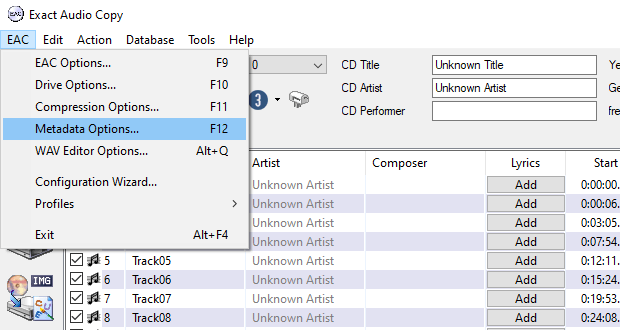
- Click on EAC located in the top left corner.
-
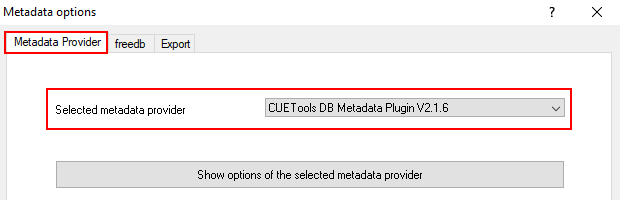
Click on Metadata Options.
-
In the 'Metadata options' window, 'Metadata Provider' tab, you make sure that CUE Tools DB Metadata Plugin is selected.
- Click on OK at the bottom of the settings window.
- Exact Audio Copy is set up now. It's time to rip a CD. To do so, make sure the audio CD you want to rip is inserted into your PC's CD drive.
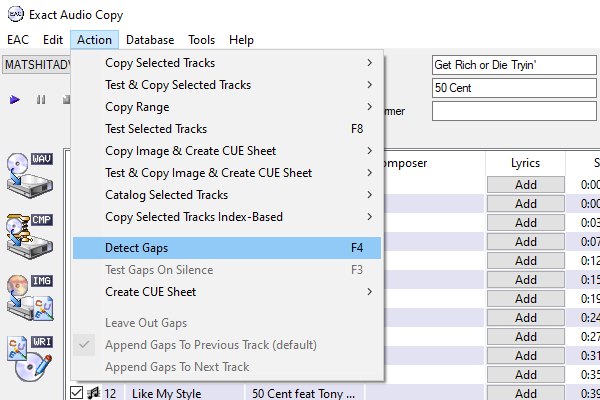
- If EAC shows CD information (titles and artists), click on Action located in the top menu. If it doesn't show CD information, you click here.
-
Click on Detect Gaps.
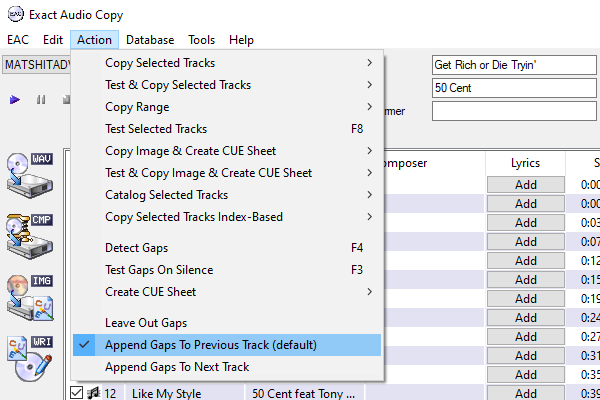
- EAC will now analyze your CD and detect gaps. When the process is complete, click again on Action located in the top menu.
-
Click on Append Gaps To Previous Track (default).
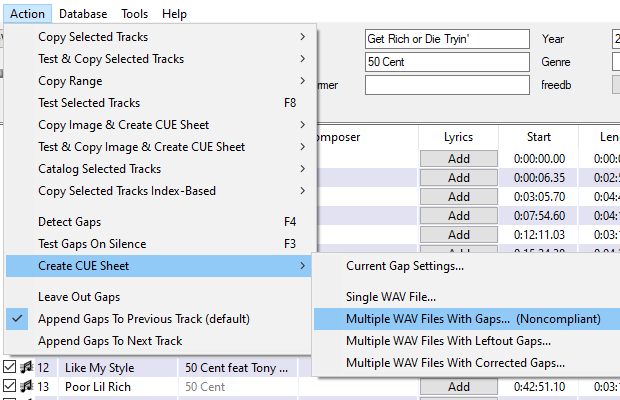
- Click on Action located in the top menu.
- Go to Create CUE Sheet.
-
Click on Multiple WAV Files With Gaps...(Noncompliant).
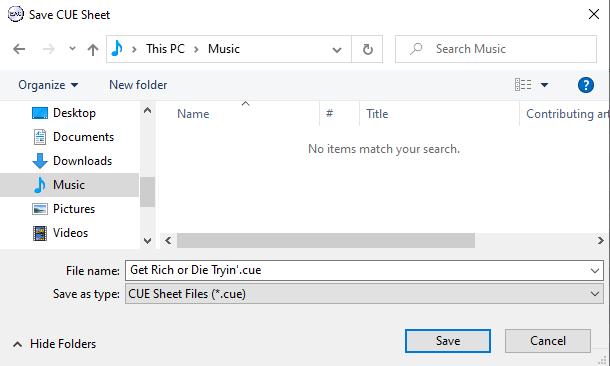
- In the 'Save CUE Sheet' window, select a location on your computer where you want to save the file.
-
Click on Save.
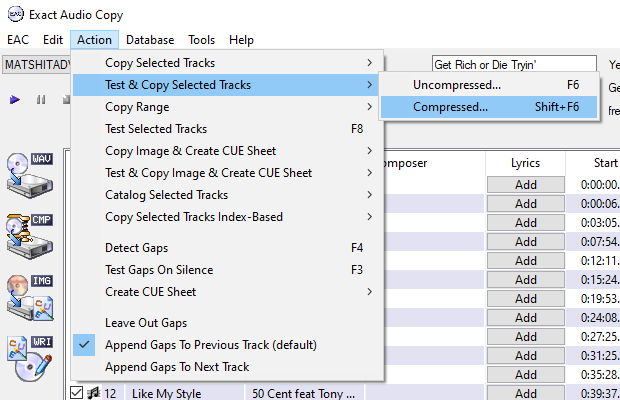
- Once the CUE sheet is created, click again on Action.
- Go to Test & Copy Selected Tracks.
-
Click on Compressed.
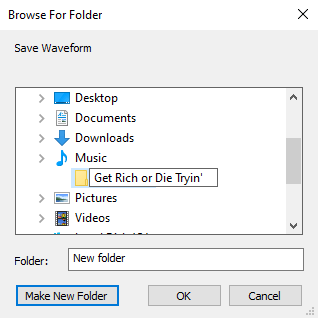
- In the 'Browse For Folder' window, select a location on your computer where you want to save the CD. You also have the option to create a new folder.
-
Click on OK.
Exact Audio Copy will now copy the music from your Audio CD to your computer.
This may take a while.
The time it takes depends on the CD, CD drive, and your PC's hardware.
Exact Audio Copy does not show CD information (titles and artists)
- Click on EAC located in the top left corner.
-
Click on Metadata Options.
- In the 'Metadata options' window, click on the freedb tab.
-
Enter your email address.
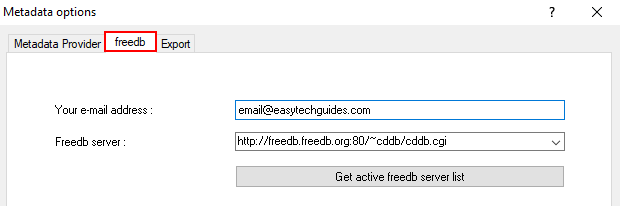
- Click on OK at the bottom of the settings window.
-
Click on Get CD Information From Metadata Provider.
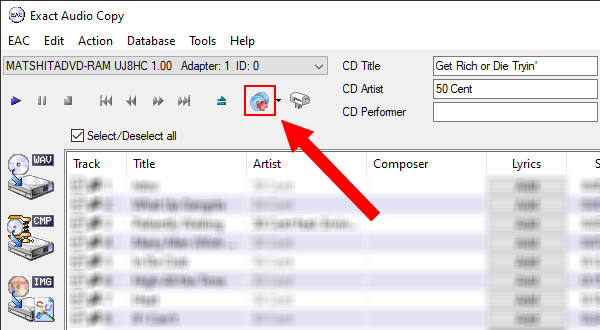
- When the warning message appears, click Yes.
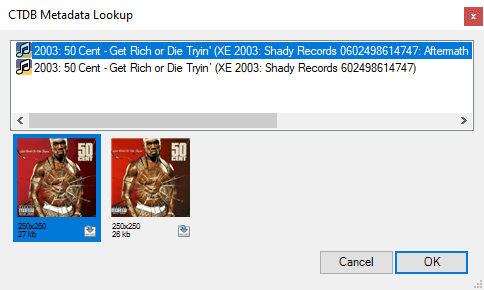
- A 'Metadata Lookup' window will appear and will search for metadata. If your CD appears in the search results list, select it.
-
Click on OK.
Exact Audio Copy will hopefully display the correct title(s) and artist(s).
How to rip an Audio CD in Windows 10 and 11 using fre:ac
fre:ac is another popular free CD ripper.
You can download fre:ac from the Microsoft Store, or you can download it from their website, here.
- Open fre:ac.
- Insert the CD you want to rip into the CD drive of your computer.
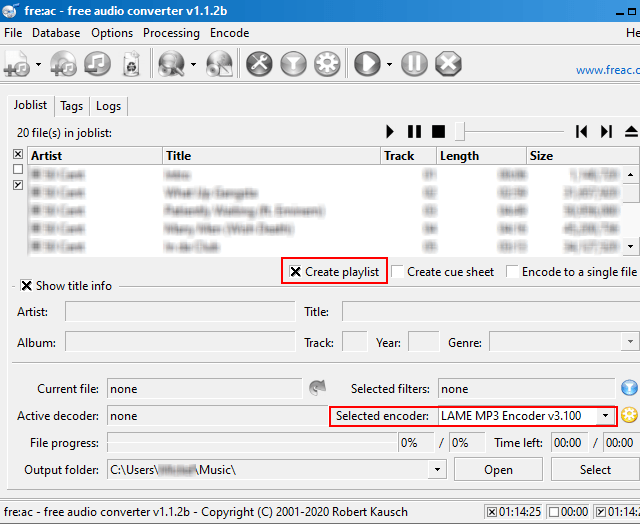
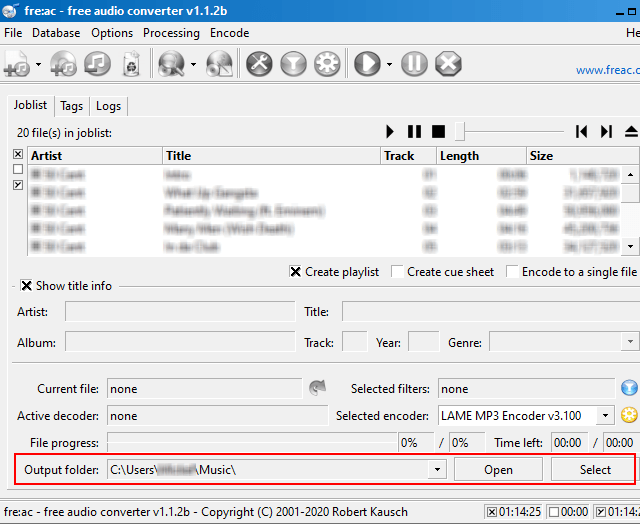
- Enable the Create playlist option.
-
At Selected encoder, select FLAC Audio Encoder, LAME MP3 Encoder, or another audio format. The WAV and FLAC audio formats offer the best quality, but the file size of the tracks will be much larger than MP3 files. I would select FLAC for high quality or MP3 if your device doesn't support FLAC or you don't have enough disk space.
-
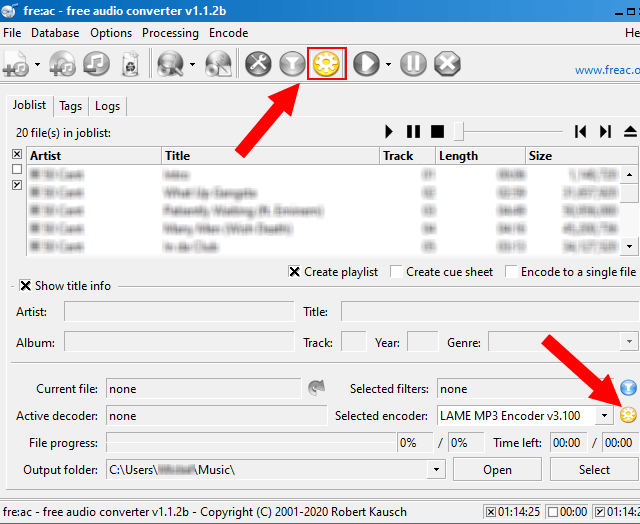
If you selected LAME MP3 Encoder, click on the settings button in the top toolbar or click on the settings button next to the selected LAME MP3 Encoder option. But if you selected WAV or FLAC, then you can skip the following steps and continue with step 10.
- In the 'LAME MP3 Encoder' window, select Custom settings at Use preset.
- In the VBR mode section, select the CBR option.
-
Set bitrate to 320 kbps.
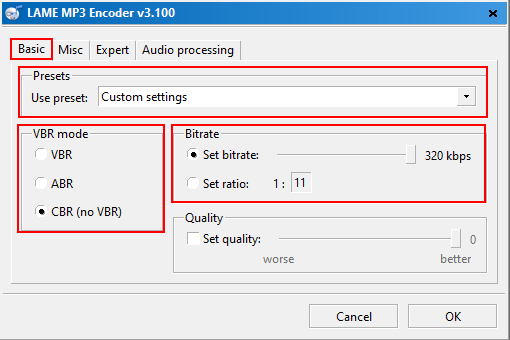
- Click on OK at the bottom of the settings window.
-
At Output folder located at the bottom, you can see and change the location on your computer where fre:ac will save the CD. You can change this location by clicking on Select.
-
Click on the start button.
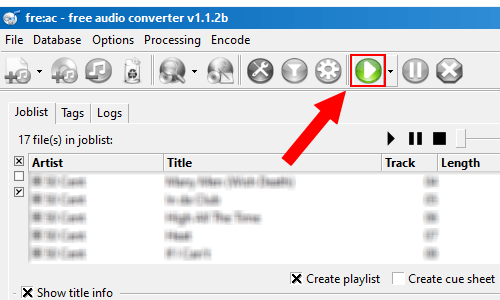
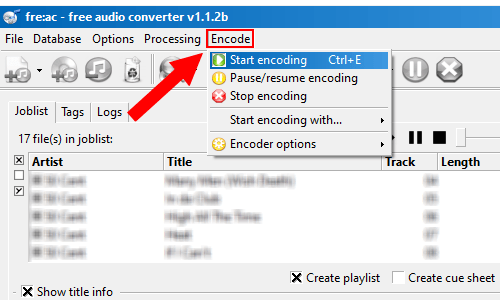
You can also click on Encode located in the top menu, and then click on Start encoding.
fre:ac will now copy the music from your Audio CD to your computer.
How to rip an Audio CD in Windows 10 and 11 using VLC media player
You can download the VLC media player from the Microsoft Store, or you can download it from their website, videolan.org.
Note: VLC doesn't allow you to rip multiple CD tracks at once.
- Open VLC.
- Insert the CD you want to rip into the CD drive of your computer.
- Click on Media in the top left corner.
-
Click on Convert / Save.

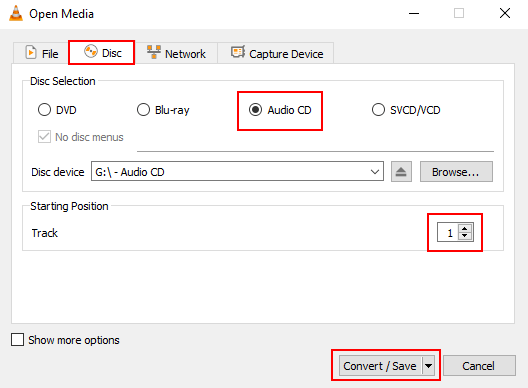
- In the 'Open Media' window, click on the Disc tab.
- Select Audio CD.
- At Track, select the track you want to save to your computer.
-
Click on Convert / Save at the bottom of the window.
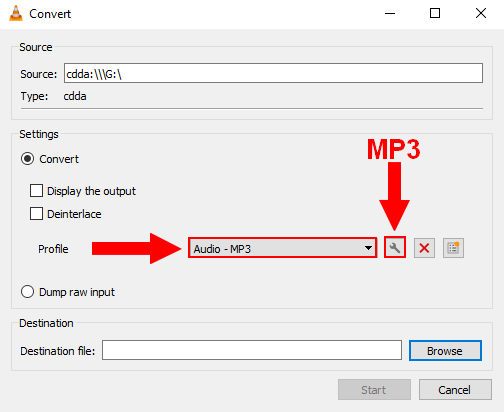
- In the 'Convert' window, select Audio - CD (WAV), Audio - FLAC, or Audio - MP3 at Profile. The WAV and FLAC audio formats offer the best quality, but the file size of the tracks will be much larger than MP3 files. I would select FLAC for high quality or MP3 if your device doesn't support FLAC or you don't have enough disk space.
-
If you selected Audio - MP3, click on the
 wrench button next to the profile selection menu. But if you selected WAV or FLAC, then you can skip the following steps and continue with step 14.
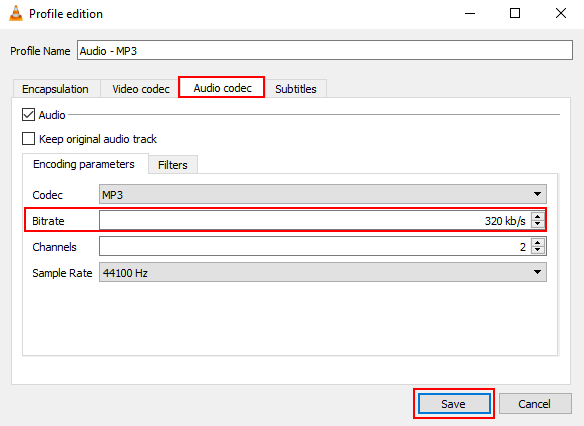
- In the 'Profile edition' window, click on the Audio codec tab.
- At Bitrate, select or type 320 kb/s.
-
Click on Save.
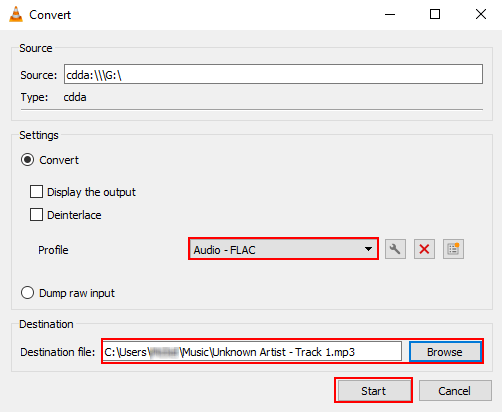
- Click on Browse.
- In the 'Save file' window, select a location on your computer where you want to save the track.
- In the File name field, enter the name of the track.
-
Click on Save.

-
Click on the Start button.
VLC will now copy the audio track from your Audio CD to your computer.
Related:
How to copy a DVD to your computer in Windows 10 and 11