How to burn a CD or DVD in Windows 11 & 10
This step-by-step tutorial will show you how to burn a CD or DVD on Windows 11 and Windows 10.
Both Windows 11 and Windows 10 include built-in CD and DVD burning capabilities through File Explorer and Windows Media Player, allowing you to burn MP3 CDs, standard audio CDs, video DVDs, data discs, and other media without downloading any third-party software.
💿 Hardware requirement: Before starting, ensure your computer features an internal or external optical disc drive capable of *writing* data (labeled as a DVD-RW, DVD±RW, or CD-RW drive). Standard reader-only drives cannot write new data to a blank disc.
Step 1: Choose the right disc format
When you insert a blank CD or DVD into your computer, Windows will prompt you with a configuration window asking how you want to use the disc. Understanding this choice is critical for device compatibility:
| Disc format type | How Windows treats it | Best used for |
|---|---|---|
| Like a USB flash drive | Uses the Live File System (UDF). Files can be saved, edited, and deleted repeatedly, but the disc will only work on modern Windows, Linux, or macOS computers. | Temporary file backups, document sharing, and rolling archives. |
| With a CD/DVD player | Uses the Mastered format. Files are compiled and burned all at once. The disc becomes read-only, making it compatible with older standalone media players, car stereos, and older computers. | Audio CDs, permanent data backups, and home movie video discs. |
File Explorer vs. Windows Media Player: Which Tool Should You Use?
Before launching a tool, use this compatibility matrix to determine whether Windows File Explorer or Windows Media Player is required for the specific type of media you are attempting to create:
| What are you burning? | File Explorer | Windows Media Player |
|---|---|---|
| Audio CD: Standard playback tracks (MP3, WAV, FLAC, etc.) | ✗ (Data disc only) | ✓ (True audio CD) |
| Data CD: Audio files (MP3 storage archive) | ✓ | ✓ |
| Data CD: Documents (Word, Excel, PDF, etc.) | ✓ | ✓ |
| Data CD: Photos (JPG, PNG, GIF, etc.) | ✓ | ✓ |
| Data DVD: Audio archives (MP3, WAV, FLAC, etc.) | ✓ | ✓ |
| Data DVD: Documents (Word, Excel, PDF, etc.) | ✓ | ✓ |
| Data DVD: Photos (JPG, PNG, GIF, etc.) | ✓ | ✓ |
| Data DVD: Video Files (MP4, MKV, AVI, etc.) | ✓ | ✓ |
| DVD-Video: Raw movie folders (VIDEO_TS directories) | ✓ | ✗ |
Method 1: Burn a Data CD or DVD in Windows 11 & 10 (File Explorer)
This is the fastest method to back up photos, documents, installation packages, or video files. It works identically across both Windows 11 and legacy Windows 10 interfaces.
- Insert a blank CD-R into your disk drive tray (avoid CD-RW discs, as older analog car stereo lasers frequently fail to reflect or read rewritten disc materials).
- Open File Explorer (press the Windows + E keys on your keyboard).
- Navigate to This PC in the left sidebar menu.
- Double-click your active optical drive icon. A Burn a Disc window prompt will pop up.
- Enter a descriptive title for your disc.
- Select the With a CD/DVD player option.
- Click Next.
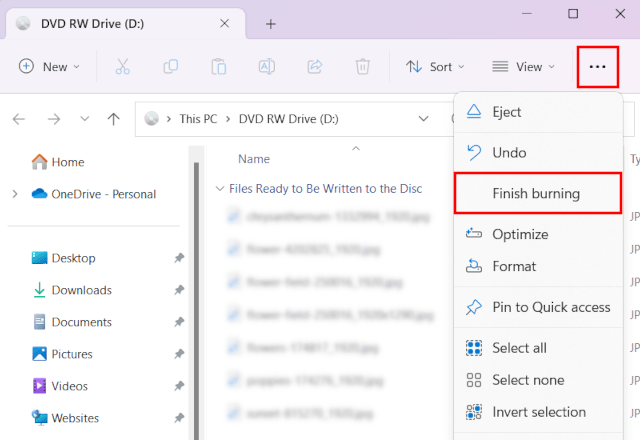
- A blank directory window will open. Drag and drop or copy and paste the files you want to burn directly into this empty folder structure. Windows will mark these files as 'Files Ready to Be Written to the Disc.'
- Click the three dots (...) menu at the top of the toolbar in Windows 11 and select Finish burning (in Windows 10, click the Drive Tools tab at the top of the window and select Finish burning).
- Choose your recording speed (default is recommended).
- Click Next.
The drive laser will begin writing data; wait for the optical tray to automatically eject when finished.
Method 2: Burn an Audio CD in Windows 11 & 10 (Windows Media Player)
If your goal is to create a music disc that plays seamlessly in standard standalone stereos or legacy home sound systems, dropping MP3 files onto a data disc via File Explorer will not work. You must compile the track sequence using a dedicated audio master system layout tool.
- Insert a blank CD-R into your disk drive tray (avoid CD-RW discs, as older analog car stereo lasers frequently fail to reflect or read rewritten disc materials).
- Click on the Windows start menu button or search bar.
- Type wmp or windows media player.
- Press Enter on your keyboard or click on Windows Media Player.
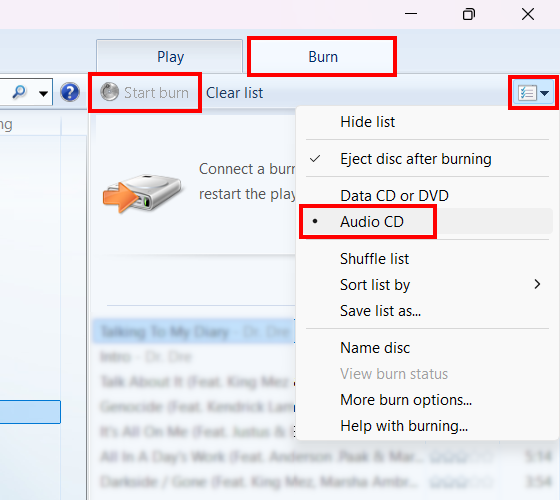
- Click on the Burn tab located in the top-right menu panel corner.
- Click the small options dropdown menu icon in the upper-right corner of the burn panel and verify that Audio CD is selected (not Data CD).
- Open File Explorer alongside Media Player, navigate to your music directories, and drag your audio tracks directly into the Media Player Burn list sidebar.
- Arrange your audio files in your preferred playback order. Note the total remaining track time indicator at the bottom (standard audio CDs max out at 80 minutes of playback).
- Click the Start burn button at the top of the pane.
The status indicator will display a percentage for each track, and the disc tray will pop open once processing is completely secure.
💡 A note on audio format conversion: Windows Media Player automatically handles file configuration on the fly. You can drag standard MP3, WAV, or WMA files directly into the list, and the tool will cleanly encode them into the uncompressed redbook audio format required by vintage stereo equipment hardware links.
Related:
How to burn videos to a DVD on Windows 11 & 10 (free)
Reliable free CD and DVD burning software for Windows 10 and 11
How to rip an Audio CD in Windows 10 and 11 (4 ways)
How to copy a DVD to your computer in Windows 10 and 11
How to copy a CD to another CD with only one drive (2 ways)
How to copy a DVD to another DVD with only one drive (2 ways)