How to fix 'The Audio Service is not running' in Windows 10
This step-by-step tutorial will show you how to fix the 'The Audio Service is not running' problem in Windows 10.
Run the Windows 'Playing Audio Troubleshooter'
Windows 10 has a built-in tool called Playing Audio Troubleshooter, which you can use to try and fix all kinds of sound problems.
- Right-click on the speaker icon located in the Windows system tray.
-
Click on Troubleshoot sound problems.
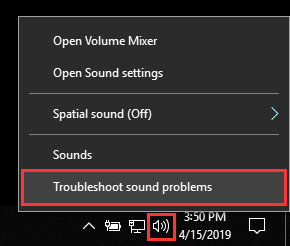
- If the tool finds a problem, follow its steps to fix it.
You can also open the tool by opening settings > System > Sound > Troubleshoot.
Check Windows Audio services
- Right-click on the Windows start menu button.
- Click on Run.
-
In the 'Run' window, you type
services.msc.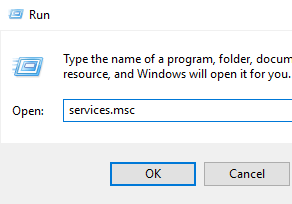
- Click on Ok or press the Enter key on your keyboard.
-
In the 'Services' window, you scroll down to the Windows Audio service.
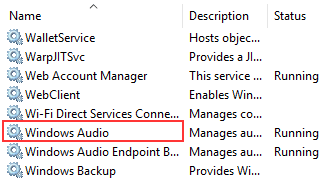
- Right-click on the Windows Audio service.
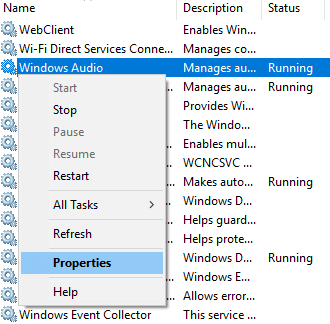
-
Click on Properties.
- Make sure the Startup type is set to Automatic.
-
Click on Start. If it's already started, click on Stop and then click on Start.
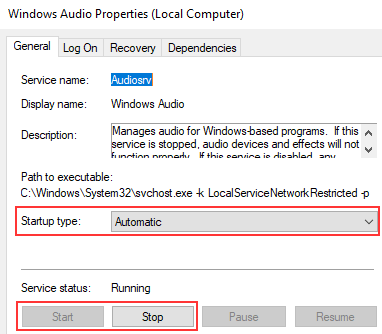
- Click on Apply.
- Click on OK.
- Right-click on the Remote Procedure Call service.
- Click on Properties.
- Make sure the Startup type is set to Automatic.
- Click on Start. If it's already started, click on Stop and then click on Start.
- Click on Apply.
- Click on OK.
- Right-click on the Windows Audio Endpoint Builder service.
- Click on Properties.
- Make sure the Startup type is set to Automatic.
- Click on Start. If it's already started, click on Stop and then click on Start.
- Click on Apply.
- Click on OK.
- If the Multimedia Class Scheduler service is on your system, right-click on it. If the service is not on your system, you're done, and you can close the 'Services' window.
- Click on Properties.
- Make sure the Startup type is set to Automatic.
- Click on Start. If it's already started, click on Stop and then click on Start.
- Click on Apply.
- Click on OK.
Roll back sound device driver
- Right-click on the Windows start menu button.
- Click on Device Manager.
-
Double-click on Sound, video and game controllers to expand it.
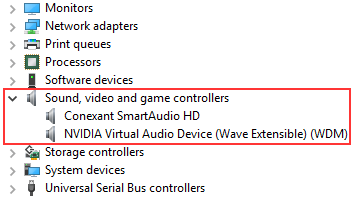
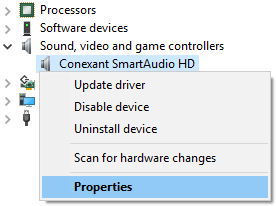
- Right-click on the sound device. On my PC, the sound device is Conexant SmartAudio HD, but it might be different on your PC.
-
Click click on Properties.
- Click on the Driver tab.
-
If there's a Roll Back Driver option, click on it.
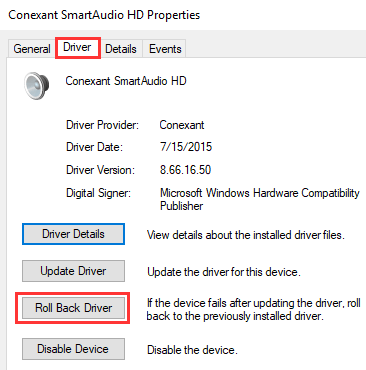
- After the process is completed, you restart your PC.
Make the 'Windows Audio' service log on as Local System account
- Right-click on the Windows start menu button.
- Click on Run.
-
In the 'Run' window, you type
services.msc. - Click on Ok or press the Enter key on your keyboard.
-
In the 'Services' window, you scroll down to the Windows Audio service.
- Right-click on the Windows Audio service.
-
Click on Properties.
- Click on the Log On tab.
-
Check the Local System account option.
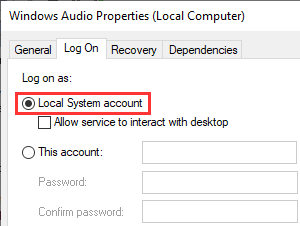
- Click on Apply.
- Click on OK.
Uninstall and reinstall sound device driver
- Right-click on the Windows start menu button.
- Click on Device Manager.
-
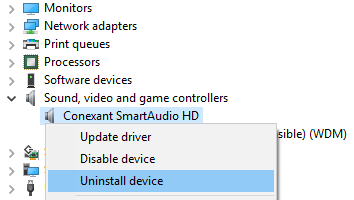
Double-click on Sound, video and game controllers to expand it.
- Right-click on the sound device. On my PC, the sound device is Conexant SmartAudio HD, but it might be different on your PC.
-
Click on Uninstall device.
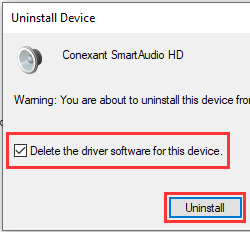
- In the 'Uninstall Device' window, you check the Delete the driver software for this device option if available.
-
Click on Uninstall.
- After the process is completed, you restart your PC.
Uninstall NVIDIA sound device driver
I had the 'The Audio Service is not running' problem on Windows 10, but I still had sound.
The problem started after I updated the NVIDIA GEFORCE driver on my PC.
The driver added a sound device (driver). My problem was solved after removing it.
The following steps will show you how to uninstall the NVIDIA sound device (driver).
- Right-click on the Windows start menu button.
- Click on Device Manager.
-
Double-click on Sound, video and game controllers to expand it.
- Right-click on the NVIDIA sound device.
- Click on Uninstall device.
- In the 'Uninstall Device' window, you check the Delete the driver software for this device option if available.
- Click on Uninstall.
- After the process is completed, you restart your PC.
This solution fixed my problem.