How to fix: Failed to run Redshift: Trying location provider geoclue2
Do you get the following error message: Failed to run Redshift: Trying location provider `geoclue2'... when you try to open Redshift? Here are a few solutions.
Solution 1: Turn on Location Services
- Open settings.
- Click on Privacy located in the left menu.
- Click on Location Services.
-
Click on the toggle button next to Location Services to switch it on.
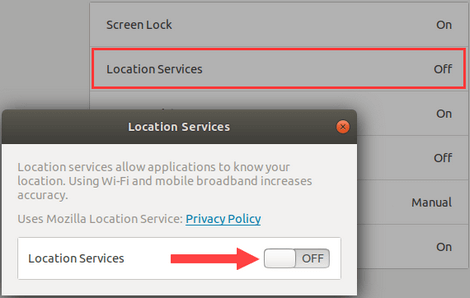
- Close settings.
Solution 2: Install GeoClue
- Open a terminal window.
-
Type (or copy and paste) the following command:
sudo apt-get install geoclue-2.0 - Press the Enter key on your keyboard.
- Enter your password.
- Press Enter.
- You can close the terminal window after the installation is complete.
Solution 3: Edit the GeoClue configuration file
Add the following lines to the geoclue.conf file:
[redshift]
allowed=true
system=false
users=
You can find the geoclue config file in the following location: /etc/geoclue/geoclue.conf.
- Open a terminal window.
-
Type (or copy and paste) the following command:
sudo nano /etc/geoclue/geoclue.conf - Press the Enter key on your keyboard.
- Enter your password.
- Press Enter.
- Go to the bottom of the geoclue.conf file by using the arrow down key on your keyboard.
-
Type (or copy and paste) the following lines:
[redshift] allowed=true system=false users= - Press the Ctrl + X keys on your keyboard.
- Press the Y key on your keyboard to save the changes.
- Press Enter.
- You can close the terminal window.
Solution 4: Downgrade GeoClue
This solution came from someone who uses Fedora.
- Open a terminal window.
-
Type (or copy and paste) the following command:
sudo dnf downgrade geoclue2.x86_64 - Press the Enter key on your keyboard.
- Enter your password.
- Press Enter.
- You can close the terminal window after the downgrade is complete.
Solution #5: Edit the Redshift configuration file
Add the following lines to the redshift.conf file:
[redshift]
temp-day=15000
temp-night=3200
fade=1
location-provider=manual

[manual]
lat=52.3
lon=4.9
You can find the Redshift configuration file in the following location: /home/YourUsername/.config/redshift.conf. If the redshift.conf file is not there, you will have to create it.
You can open the Redshift configuration file using the following command:
sudo nano /home/YourUsername/.config/redshift.conf
The meaning of the lines in the Redshift configuration file:
- temp-day is the color temperature for day time.
- temp-night is the color temperature for night time.
- fade is to make the transition between color temperatures smooth and not suddenly.
- location-provider=manual allows us to enter our location manually so that Redshift will know the sunrise and sunset times by itself according to the latitude and longitude information we enter.
- lat is the latitude of our location.
- lon is the longitude of our location.
Steps
- Open a terminal window.
-
Type (or copy and paste) the following command:
sudo nano /home/YourUsername/.config/redshift.conf - Press the Enter key on your keyboard.
- Enter your password.
- Press Enter.
-
Add the following lines to the redshift.conf file:
[redshift] temp-day=15000 temp-night=3200 fade=1 location-provider=manual [manual] lat=52.3 lon=4.9 - Press the Ctrl + X keys on your keyboard.
- Press the Y key on your keyboard to save the changes.
- Press Enter.
- You can close the terminal window.