
How to change folder picture or thumbnail in Windows 11 and 10
When organizing your files, custom folder thumbnails make it much easier to identify photo albums, movie collections, or work projects at a glance. Whether you want to display a specific image inside a folder preview or replace the folder icon graphic entirely, Windows 11 and 10 allow you to customize your folder visuals easily. This guide shows you how to change folder pictures and thumbnails in Windows 11 and 10.
Quick tutorials: Right-click any folder and select Properties. Go to the Customize tab, click Choose File under Folder pictures, select your image, and click OK. (Note: To change the entire folder graphic, click Change Icon at the bottom of the same tab instead).
How to change a folder picture (thumbnail preview)
Changing a folder picture places your selected image inside the folder preview in File Explorer when viewed in Medium, Large, or Extra Large icons mode.
- Right-click the folder you want to customize and select Properties.
- Click the Customize tab at the top of the window.
- In the Folder pictures section, click Choose File.
- Browse to and select your image file (JPG, PNG, or BMP).
- Click Open.
- Click Apply.
- Click OK.
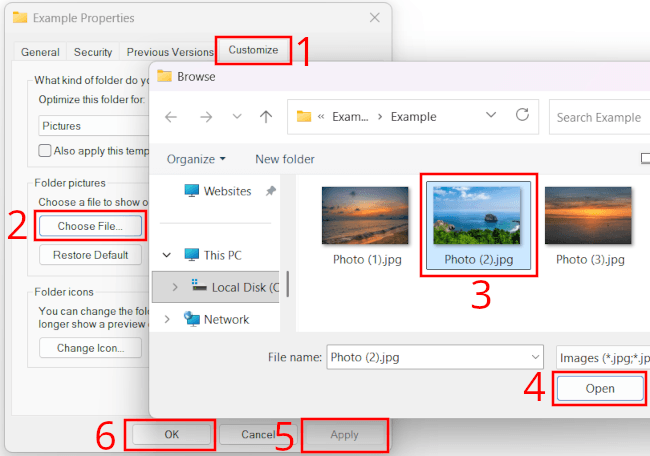
To revert back to the default Windows preview, return to the Customize tab and click Restore Default.
How to change a folder icon (.ico)
If you want to replace the standard yellow folder visual entirely with a custom graphic (such as a colored folder or custom logo), you need to change the folder icon rather than the thumbnail picture.
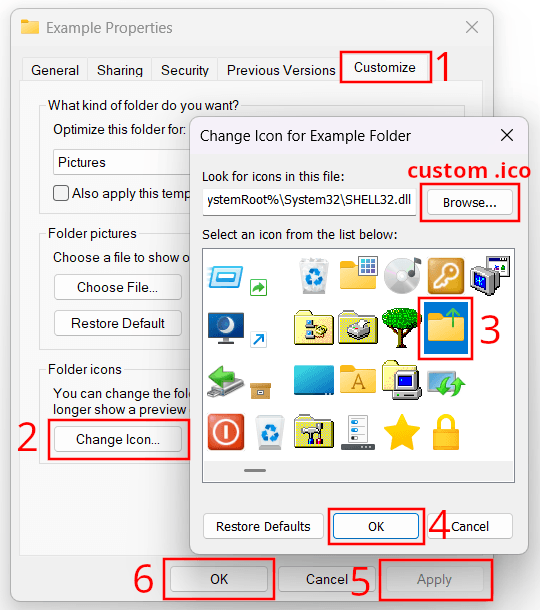
- Right-click the folder you want to customize and select Properties.
- Select the Customize tab.
- In the Folder icons section at the bottom, click Change Icon.
- Choose an icon from the default Windows library, or click Browse to select your own custom .ico file.
- Click OK.
- Click Apply.
- Click OK to save your changes.
The "folder.jpg" and "cover.jpg" automatic thumbnail trick
If you manage large music collections, photo libraries, or movie folders, manually setting folder pictures for dozens of directories takes too long. Windows offers a built-in shortcut to set thumbnails automatically.
- Open the folder you want to customize.
- Copy the image you want to use as the thumbnail into that folder.
- Rename the image file to exactly folder.jpg or cover.jpg (this also works for .png images).
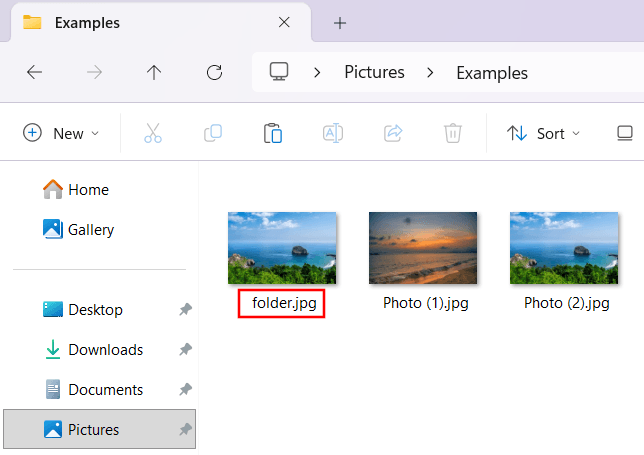
Windows File Explorer will automatically detect folder.jpg or cover.jpg and use it as the folder's preview image without requiring you to open the Properties menu.
Troubleshooting: Folder thumbnails not displaying
If your custom folder picture or thumbnail doesn't show up after saving changes, check these common causes:
- Check File Explorer layout: Folder thumbnails only render in Medium icons, Large icons, or Extra large icons views. If File Explorer is set to Details or List, thumbnails will not appear.
- Enable Thumbnails in Folder Options: Open File Explorer, click View > Options (or the three-dots menu > Options in Windows 11). Under the View tab, ensure Always show icons, never thumbnails is unchecked.
- Clear the Windows icon and thumbnail cache: If Windows continues showing an old thumbnail, press Windows + R, type
cleanmgr, select your main drive, check Thumbnails, and click OK to clear corrupted preview files.
Related:
Fix: Thumbnails not showing in Windows 10 or 11 File Explorer